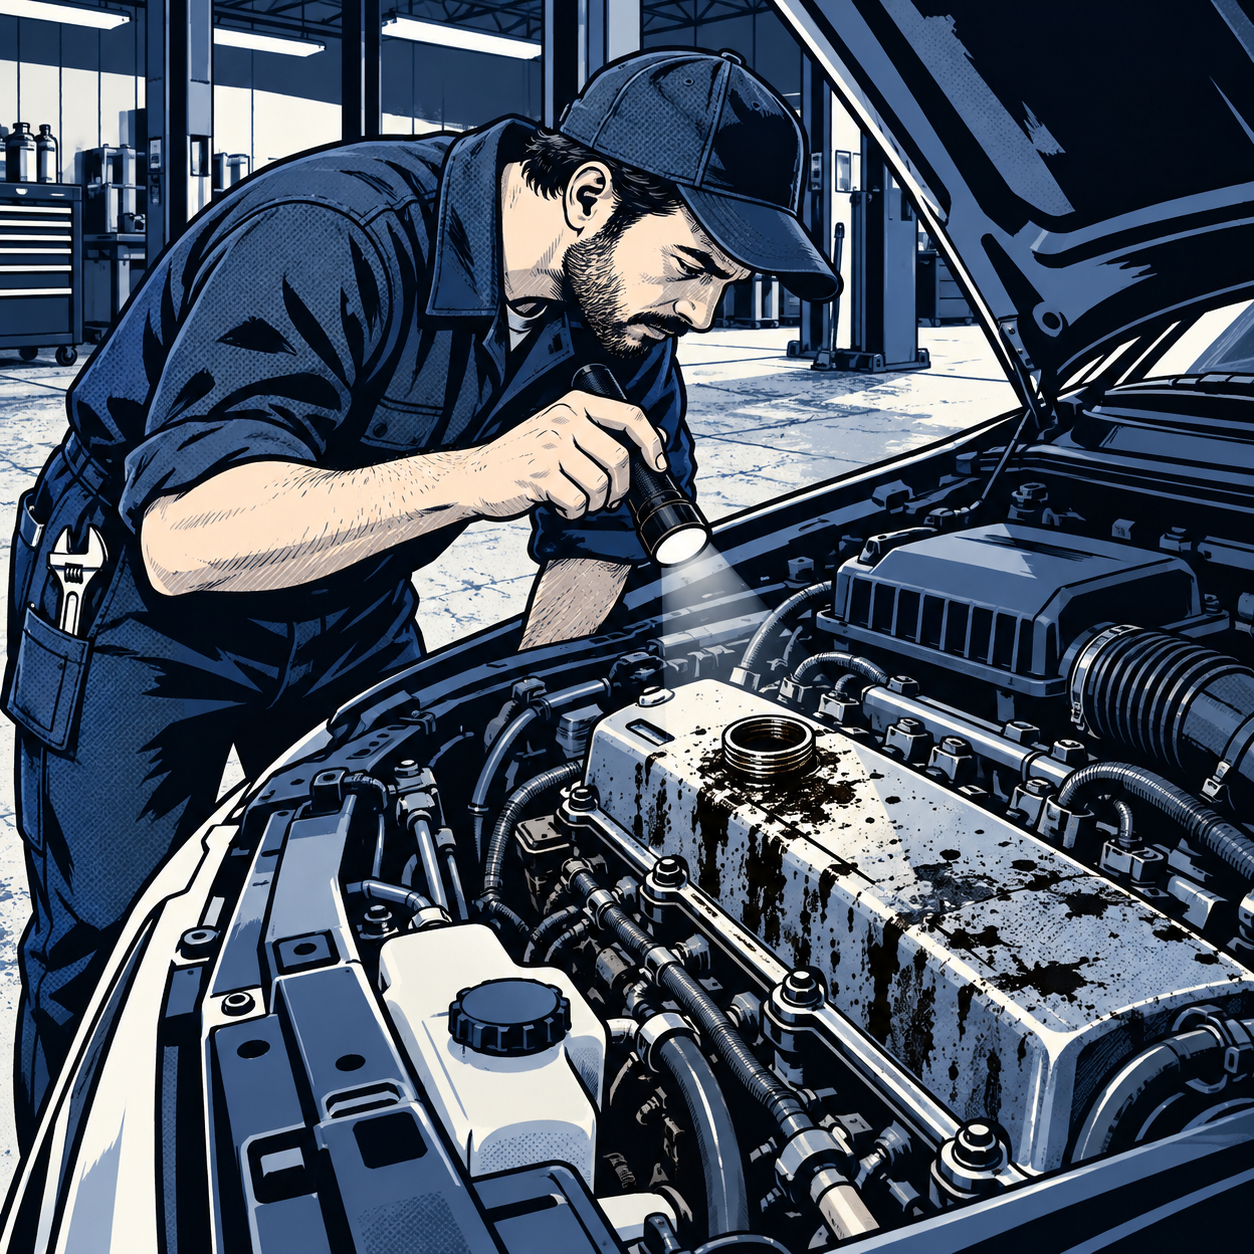
A customer pulls in smelling smoke, pops the hood, and finds the engine bay coated in oil with the filler cap nowhere in sight. This is one of the most common comebacks at quick lube shops, and it’s almost always the same root cause: the cap never got reinstalled after the oil change. What looks dramatic is usually survivable, but how you handle the next hour determines whether it stays a minor inconvenience or turns into a real repair bill. Here’s a practical walkthrough for diagnosing the damage, understanding why a missing cap does more than just make a mess, and getting it corrected the right way.
Confirm the Cap Is Actually Missing
Before assuming anything else, pop the hood and look directly at the valve cover or cam cover where the oil fill port sits. If the threads are wet and glossy with oil and there’s an open hole where a cap should be, that’s your answer — not a blown gasket, not a cracked hose, just a cap that was never put back on. Check the obvious spots first: sitting loose in the engine bay, resting on the radiator support, or rolled into a wheel well. Techs leave caps sitting on nearby components more often than you’d think, and sometimes it’s still recoverable.
If the cap is genuinely gone, don’t drive the vehicle any real distance. Oil venting from the open port at highway RPM can spray onto the exhaust manifold or turbocharger, and that’s a fire risk, not just a cleaning problem. A short, slow drive back to the shop is reasonable; anything further should be a tow or a replacement cap installed on the spot before continuing.
Check the Oil Level Before You Go Anywhere
Pull the dipstick and check the level. An open filler port can pump out a surprising amount of oil, especially if the vehicle was driven any distance with the cap off — oil mist and spray exit through the opening as crankcase pressure builds. If the level is low, top it off with the correct oil spec for the vehicle before driving it anywhere, even a short distance to the shop. Running an engine low on oil, even briefly, is how a cosmetic mistake turns into a bearing or cam-related repair.
If you don’t have the right oil on hand, a quart of the correct viscosity from any auto parts store is enough to get the vehicle back to the shop safely. Keep the receipt — it’s a legitimate expense to include when you ask the original shop for reimbursement.


Understand Why This Isn’t Just Cosmetic
On many modern engines, especially gasoline direct-injection (GDI) and turbocharged platforms, the oil filler cap is part of the sealed PCV (positive crankcase ventilation) circuit. The crankcase is held under vacuum — often in the range of tens of inches of water column on newer engines — pulled by the intake manifold through the breather and PCV valve. With the cap off, that vacuum draws unmetered outside air straight into the crankcase through the open port instead of through the calibrated PCV passages.
The result is a lean condition at idle and low load: the ECU’s fuel trims shift to compensate for air the mass airflow sensor never measured, and depending on how aggressively the PCV system is designed, you can see a rough idle, a check engine light, or stored lean-condition and misfire codes. Some naturally aspirated engines with looser crankcase pressure tolerances barely notice and just puff a little vapor out the open port; turbocharged and tightly sealed GDI engines are far more likely to run poorly or throw codes. Either way, treat an open filler port as an active vacuum leak until proven otherwise, not a purely cosmetic issue.
Inspect for Debris and Contamination
An open oil fill port for any meaningful driving distance is also an entry point for dust, moisture, and road debris straight into the crankcase. This matters more in dusty environments or if the vehicle was driven on unpaved roads or in rain before the cap’s absence was noticed. If the vehicle covered more than a few miles with the cap off, it’s worth having a shop check the air filter area and consider whether an oil and filter change is warranted again, since abrasive contamination in the oil accelerates wear on bearings and cylinder walls.
This is also the point to do a basic visual damage check: look for oil pooled near the exhaust manifold, any discoloration or scorching on nearby wiring insulation or heat shields, and confirm there’s no active oil drip from anywhere other than the filler neck itself. Photograph everything before you clean or touch anything — this documentation is what gets you a refund or a proper repair at no cost.
Clean the Engine Bay Correctly
Oil-soaked plastics, wiring looms, and heat shields need to be degreased, not just wiped down, because residual oil smokes and smells for a long time if it’s left to bake onto hot components. A citrus or solvent-based engine degreaser (not foaming cleaners, which are harder to rinse fully) applied with a brush works well on caked-on areas, followed by a low-pressure rinse.
A pressure washer can be used on an engine bay, but only with real caution: keep the wand away from electrical connectors, the air intake, and any exposed wiring, and run the engine while rinsing so residual water doesn’t sit and corrode components, then let it idle afterward until everything dries out. On a vehicle with aging connectors or a known history of electrical gremlins, skip the pressure washer entirely and stick to hand-washing with a garden hose and brush — the risk of forcing water into a connector isn’t worth it for a cosmetic cleanup. This is also, frankly, the shop’s job to fix, not yours — push for them to detail the bay rather than doing it yourself unless you want it done immediately.
Hold the Shop Accountable
Once the immediate safety issue is handled — cap reinstalled, oil level correct, no active leak — document the full incident with photos, mileage driven before you noticed, and a written timeline. Call the shop, explain what happened, and be specific about what you expect: a replacement cap, a full detail of the oil-contaminated engine bay, confirmation that no debris entered the crankcase, and ideally a different technician handling the redo. If a second, independent mechanic found any damage or needed to perform additional diagnostics (checking codes, verifying the PCV system, confirming oil level and condition), that invoice should go back to the original shop for reimbursement. Most reputable shops will make this right without a fight, since it’s a well-known and preventable mistake — but having documentation protects you if they push back.
Quick Checklist
- Confirm the cap is actually missing by checking the filler neck and surrounding engine bay
- Check and correct the oil level with the proper spec before driving further
- Reinstall a cap (used or new) before driving any real distance — don’t drive with the port open
- Scan for codes or note any rough idle/lean-condition symptoms, especially on turbo or GDI engines
- Photograph oil spray, wet threads, and any affected components before cleaning
- Degrease and rinse carefully, avoiding electrical connectors if using a pressure washer
- Contact the shop with documentation and request cap replacement, detailing, and reimbursement for any outside repairs


Frequently Asked Questions
Is it safe to drive with the oil fill cap off?
Only for a very short, slow distance to get back to the shop. Oil can spray onto hot exhaust components and create a fire risk, and the open port acts as an unmetered vacuum leak on many modern engines.
Will a missing oil cap damage my engine?
Usually not permanently, as long as the oil level stays adequate and it’s caught quickly. The bigger risks are low oil level from spray-out, debris entering the crankcase, and drivability issues from the vacuum leak — not direct mechanical damage.
Why did my check engine light come on after an oil change?
If the filler cap is part of the sealed PCV circuit, removing it lets unmetered air into the crankcase and intake, creating a lean condition that can trigger fuel trim or misfire codes, particularly on turbocharged or GDI engines.
Can I use a pressure washer to clean oil off my engine bay?
Carefully, yes — keep it away from connectors, the air intake, and exposed wiring, and run the engine afterward to help dry residual moisture. On older vehicles or ones with known electrical issues, hand-washing is safer.
Who pays if a shop leaves the oil cap off?
The shop that performed the oil change should cover a replacement cap, a full engine bay detail, and any diagnostic or repair costs tied to the mistake, including a second opinion if you choose to get one.
How do I know if the cap is part of my PCV system?
Check your owner’s manual or a repair database for your specific engine; generally, turbocharged and direct-injection engines are more likely to integrate the filler cap into a sealed crankcase ventilation design than older naturally aspirated engines.
Shop Oil Change Tools
A missing oil fill cap is one of the most common comebacks — easily prevented with a complete tool setup. Check our automotive oil change tools for the essentials.
- Replacement oil fill caps and adapters
- Drain pans and fluid containment systems
- Filter wrenches and removal sockets

The Toolsource Technical Team blends decades of real-world automotive service experience with up-to-date technical research. Our writers collaborate with professional mechanics, shop owners, and diagnostic specialists to deliver practical, workshop-ready guidance you can trust.


Follow us on social media