White Paint Peeling on Hyundai (and Others): Diagnosis, Warranty, and Proper Repair
White paint peeling off in sheets on late-2010s vehicles—especially Hyundai/Kia, Toyota, and some Honda/Chevy models—is a well-documented adhesion failure at the factory coating stack. Technicians regularly see the hood and roof lose the white topcoats, exposing an intact dark green/gray e-coat underneath. This article gives working techs a concise workflow: how to confirm factory delamination vs. prior refinish, how to document for potential OEM coverage, and how to execute a durable repair that won’t come back.
Identify Factory Adhesion Failure vs. Refinish Issues
Start with a structured inspection to determine whether you’re dealing with a factory coating stack failure or a prior refinish mistake. This guides both your estimate and any warranty discussion with the dealer/manufacturer.
Common field symptoms of factory delamination on white/pearl white:
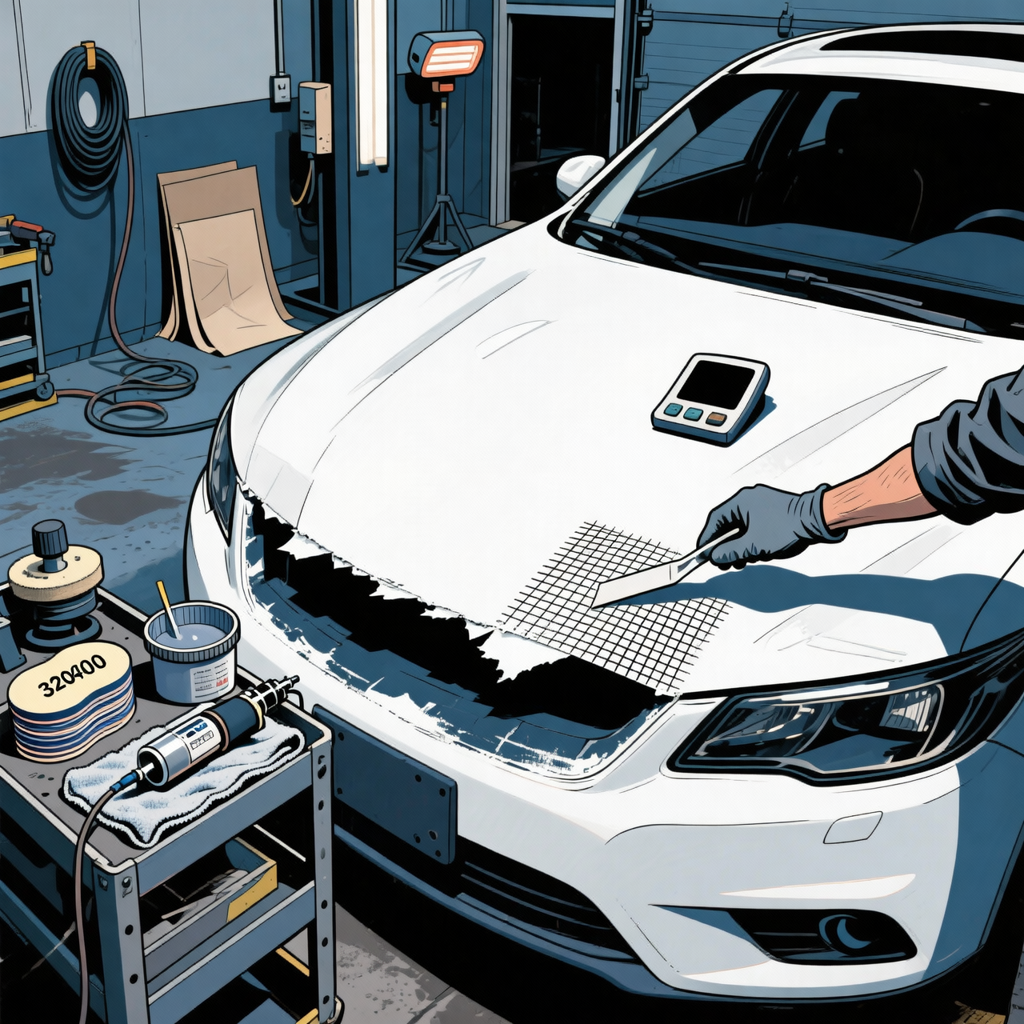
- Large sheets of white base/clear lifting from the panel, often starting on hood leading edge, roof, A-pillars, and decklid. Edges lift cleanly with minimal feathering.
- Exposed substrate is smooth dark green/gray or black e-coat (cathodic electrocoat), not bare steel. No sanding scratches visible in the substrate.
- No telltale overspray lines or blend edges around hood/roof moldings. Fasteners and seals present original positioning and torque paint marks.
- Failure propagates under intact paint when probed at the edge—paint can be lifted further with little effort.
Checks to perform and document:
- Paint thickness gauge (PTG): OEM stacks are often 3.5–5.5 mil (90–140 µm) on exterior steel panels. Broadly consistent readings across the panel indicate original paint. Readings well above ~7–8 mil can indicate a refinish.
- Cross-hatch tape test (ASTM D3359 guideline): On a marginal area, lightly score a 6×6 grid through clear/base to substrate with a cross-hatch cutter or sharp blade; apply high-adhesion tape and pull. Factory delamination will typically undercut in squares and peel to e-coat.
- Razor-lift test: At an existing edge, gently lift with a plastic razor/scraper. If base/clear releases in sheets leaving uniform e-coat, it points to intercoat adhesion failure between e-coat/sealer or sealer/base.
- Contamination scan: Degrease and inspect for fish-eyes/silicone craters (would hint at refinish contamination rather than factory delam).
- Refinish indicators: Overspray on moldings, mismatched orange peel, tape line inside hem flanges, non-OEM seam sealer texture, misaligned hood bumpers or hardware, paint on fasteners.
Note: E-coat color varies by plant and supplier (dark green, gray, or black are typical). In many failure cases, e-coat remains well-adhered to the steel but the sealer and base/clear did not bond sufficiently to it.
Warranty Paths and What to Check Before You Refinish
Even if the vehicle is beyond basic paint warranty (often 3 years/36,000 miles), some makers have published extended coverage programs for white paint delamination. Hyundai has issued Warranty Extension programs for specific models/VIN ranges (e.g., program Z05 covered select 2019 Santa Fe vehicles for white paint delamination). Coverage and eligibility are VIN-specific and time-limited.
Best practices:
- Run the VIN on the manufacturer’s program checker if one exists. For Hyundai in the U.S., dealers can confirm eligibility; some programs also provide public VIN portals.
- Call the Hyundai dealer’s body shop or service department. Ask specifically about any active paint delamination extensions for solid white or pearl white. Provide photos showing sheets peeling to e-coat and your PTG readings.
- Document panel history: If the hood/roof has ever been replaced/refinished, OEM coverage is usually denied.
- If not covered, ask about goodwill participation. Some dealers will offer partial coverage when documentation clearly shows a known adhesion failure pattern.
- Set customer expectations: If one horizontal panel has failed, other horizontal panels (roof, decklid) often begin failing later. Discuss options: targeted panel refinishes now versus staged or comprehensive refinishing.
Insurance typically does not cover manufacturer-related paint adhesion failures. Advise customers to pursue OEM goodwill first if outside formal programs.
Estimating and Planning the Repair
Scope depends on the spread and whether peeling undercuts sound areas. Avoid spot-only patches on the middle of panels; edges will likely propagate.
General guidance:
- Hood-only peeling with strong edges: Plan to refinish the entire hood. If solid white, you can often avoid blending fenders by smart sealer tinting and spray-out verification; tri-coat pearls typically require blending into adjacent panels for match quality.
- Roof peeling: Plan for full roof refinish. Consider removing roof moldings/roof rack for clean edges and durability.
- Tri-coat pearls (three-stage): Budget for test panels and additional labor to dial in midcoat coverage and flop. Blending adjacent panels is the safe path.
- Full strip or partial? Remove all unsound coatings. If e-coat is intact and well keyed, you may refinish over it. If corrosion is present or e-coat is compromised, strip to clean metal and use epoxy primer.
- Labor and materials: Expect additional labor for coating removal, feathering, sealer optimization (white/sealer shade), and possible IR/bake cycles to drive out solvents for maximum adhesion.
Refinish Procedure: Durable Fix for White Paint Delamination
This workflow assumes steel panels with remaining factory e-coat after delamination. Adjust for aluminum or composites per OEM and material supplier guidance.
Safety and setup:
- PPE: Half-mask respirator (P100/OV), eye protection, gloves, paint suit.
- Environment: Clean, filtered booth; panel temps 68–77°F (20–25°C); proper airflow.
- Tools/materials: PTG, plastic razors, DA sander with interface pad, abrasives (P80, P120, P180, P220, P320–P400, P600–P800 wet), panel wipe/degreaser (silicone-free), lint-free wipes, adhesion promoter (if substrate requires), epoxy primer or 2K primer-surfacer, sealer (tintable; white or light gray), basecoat (solid white or tri-coat system matched by color code), midcoat pearl (if tri-coat), clearcoat (2K high solids), mixing cups, strainers, HVLP/LVLP gun set, masking film/paper, tack cloth, IR curing lamp (optional), denibbing discs and compounds.
Process steps:
- Decontamination and wash:
- pH-balanced wash, followed by dedicated wax/grease remover. Consider iron remover on roofs/hoods to reduce embedded fallout. Dry thoroughly.
- Remove loose coatings:
- Use plastic scrapers/razor blades to lift any freely releasing base/clear. Avoid gouging the e-coat.
- DA sand remaining edges with P80–P120 to knock down high lips; then feather transition with P180–P220 until you have a smooth ramp from e-coat/bare metal to existing paint.
- Substrate assessment:
- If bare metal is exposed or e-coat shows break-throughs/rust, remove corrosion to bright metal. Blow off, re-clean, and immediately apply epoxy primer per tech sheet. Avoid acid etch over OEM e-coat.
- If e-coat is intact: Scuff the e-coat and any remaining OEM paint with P220–P320 (DA with interface pad). You need a uniform mechanical tooth; glossy e-coat will not hold long-term.
- Filling and surfacing:
- Use a thin polyester glazing putty only where needed to level transitions. Block with P180–P220, then refine to P320–P400.
- Apply 2K primer-surfacer to repair zones. Flash and block-sand with P320–P400 until surface is flat, then refine to P600 for solvent base or P800 for waterborne base (follow paint line guidance).
- Sealer selection and application:
- Use a white or light-gray sealer. Sealer shade is critical for white coverage and uniformity. Tint sealer to target if your system supports it.
- Apply one medium-wet coat. Allow recommended flash. The goal is a uniform substrate color to prevent mapping through the white.
- Basecoat application (solid white):
- Stir/mix per tech sheet. For waterborne, ensure airflow and proper flash between coats.
- Apply 2–3 medium coats until hiding is complete. Verify on a black-and-white check card. Maintain consistent gun distance and overlap to avoid striping.
- Tri-coat pearl process (if applicable):
- Spray a solid white ground coat to full hide and correct value.
- Apply midcoat pearl in controlled, even passes. Count coats and use a spray-out card to match OEM flop and face. Typically 1.5–3 coats, but match to the car under similar lighting.
- Blend adjacent panels for a seamless transition unless your color system and test panels prove a panel-only repair is invisible (rare on tri-coats).
- Clearcoat:
- Apply 2 coats high-solids clear, respecting flash times. Target proper film build and edge coverage on hood/roof leading areas.
- Optional force dry or IR cure per product data sheet to enhance early hardness and reduce imprinting.
- Denib and polish:
- After full cure, nib with P1500–P3000 where necessary. Compound and polish to OEM gloss. Clean residues and inspect under color-correct lighting.
- Reassembly and QC:
- Reinstall trims, gaskets, and hardware. Verify panel gaps and hood bumper adjustments. Perform water test and final wipe-down.
Key adhesion tips:
- Do not seal over glossy e-coat; always scuff to a uniform matte finish.
- Control contamination: fresh tack cloths, final panel wipe, clean air supply (use filters and water traps), and keep silicone products away from spray areas.
- Mind flash times and temperature; rushing the stack invites solvent entrapment and future delamination.
Prevent Comebacks and Set Customer Expectations
Technically sound repairs start with substrate control and end with clear communication:
- Explain the failure mode: It’s an intercoat adhesion issue; once it starts on one horizontal panel, others may follow. Offer tiered options (panel vs. multiple panels).
- Use sealer shade to stabilize color and reduce basecoat load—helps with whites that lack hiding.
- For tri-coats, plan on blends and spray-outs to avoid mismatches.
- Deliver a care sheet: Avoid harsh washing for 30 days, no adhesives on fresh paint, and avoid aggressive pressure-washer nozzles at panel edges.
- Retain documentation: Photos, PTG readings, test cards, and materials lot numbers. If an OEM goodwill opportunity opens later, you have a record.
Quick Intake Checklist
- VIN, mileage, in-service date, and paint code recorded
- PTG readings across affected and adjacent panels
- Photos: wide shots and close-ups showing sheets peeling to e-coat
- Cross-hatch tape test outcome noted
- Evidence of prior refinish? (yes/no and where)
- Panels affected and spread mapped
- Customer advised on OEM warranty check and likely scope
FAQs
Why is white more prone to this problem?
White pigments have poor hiding, so systems rely heavily on sealer shade and correct film build. If the sealer-to-e-coat or base-to-sealer adhesion is marginal—due to timing, prep, or contamination—failures show quickly on high-heat, horizontal panels. Tri-coat pearls add another sensitive layer (midcoat) that complicates adhesion and matching.
How can I tell e-coat from primer or bare metal?
E-coat is smooth and uniform, typically dark green, gray, or black. Bare steel is metallic and will flash-rust quickly. Primer-surfacer is usually lighter gray and shows sanding scratches. A PTG and visual cue under bright light help distinguish them.
Should I strip the entire panel?
If delamination is widespread or undercutting is easy with a razor at multiple points, remove all unstable coatings to a sound substrate. If the e-coat is intact and well keyed, you can refinish over it. If corrosion is present or adhesion is questionable, strip to clean metal and epoxy prime.
Can I spot-repair only the affected patch on a hood?
Not recommended. Edges tend to continue lifting. Refinish the entire panel for durability. For solid whites, panel-only repairs are feasible with correct sealer shade; tri-coats usually require blending adjacent panels.
Will insurance pay?
Insurers typically deny manufacturer-related adhesion failures. Advise customers to check with the dealer for any extended paint programs or goodwill. If none apply, proceed with a customer-pay estimate.
What grits and primers work best over intact e-coat?
Scuff e-coat and OEM paint to P220–P320 for surfacer, then refine to P320–P400 before sealer. Use epoxy primer on bare metal or questionable areas; otherwise a quality 2K primer-surfacer and a properly tinted sealer provide an ideal base for white coverage.
Shop Automotive Paint & Finishing Tools
Need the right gear to diagnose and repair white paint delamination? See Automotive Paint & Finishing Tools for inspection, prep, and finishing equipment that supports the workflow in this guide.
- Paint thickness gauges, plastic razors, and inspection tools.
- DA sanders, sanding blocks, abrasives, and masking gear.
- HVLP/LVLP spray guns, mixing/straining, polishing, and denib tools.
The Toolsource Technical Team blends decades of real-world automotive service experience with up-to-date technical research. Our writers collaborate with professional mechanics, shop owners, and diagnostic specialists to deliver practical, workshop-ready guidance you can trust.


Follow us on social media