Well-executed metal work on a quarter panel preserves factory seams, limits blend areas, and reduces parts cost. But it only pencils out if your process is controlled, measurable, and documented. This guide lays out a technician-first workflow—assessment, pulling and measuring, metal finishing, adjacent panel strategy, protection, and ADAS bracket checks—with time planning you can defend on an estimate.
1) Map the Damage and Build an Estimate You Can Support
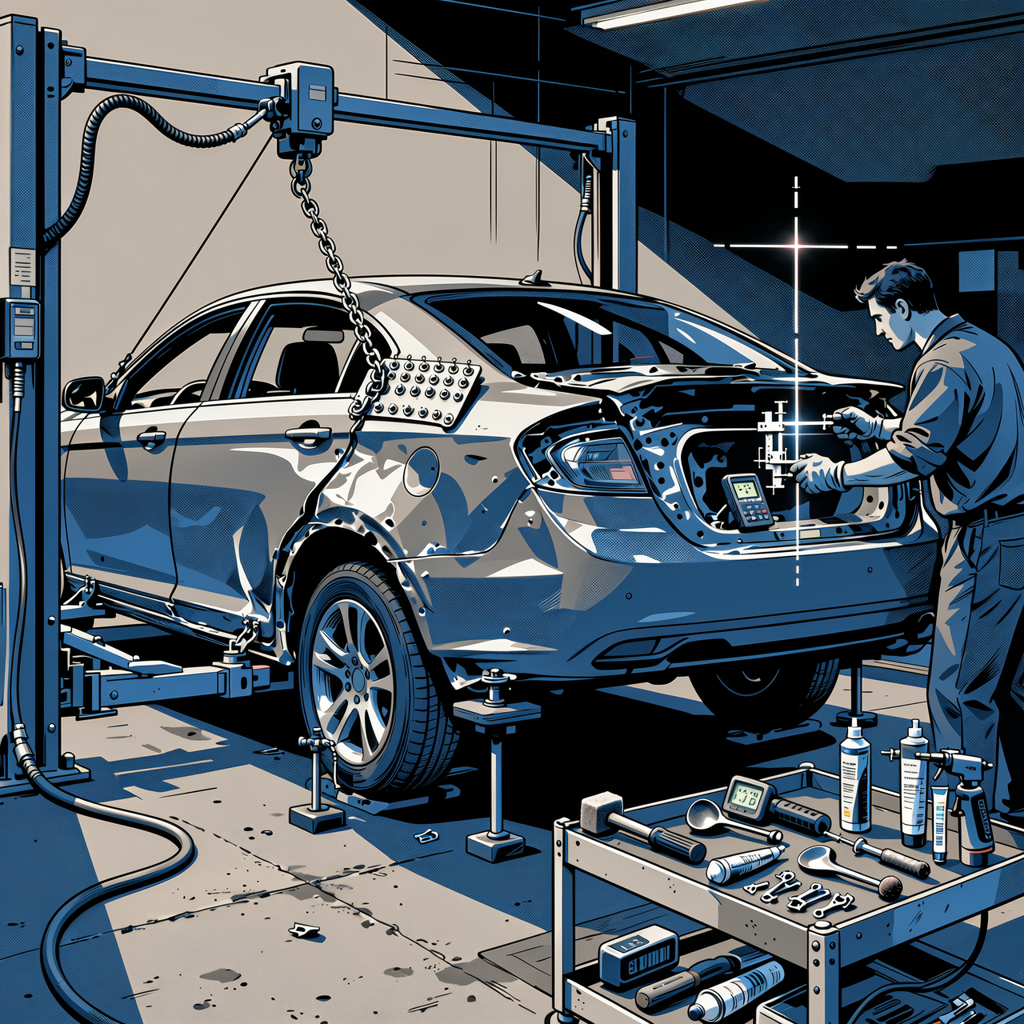
Start by identifying the structures affected beyond the outer skin. A quarter hit often distorts the wheelhouse flange, tail lamp pocket trough, trunk gutter, fuel door pocket, and the rear body rail flange. Modern quarters may also carry blind spot radar or other sensors behind the panel.
- Safety and prep: Disconnect the battery before any welding. Remove interior trim and rear seat bolsters to clear foam, wiring, and airbags. Pull the rear lamp for pocket access and wiring integrity checks.
- Measure first: Record baseline with a tram gauge and, if available, a 3D/laser system. Capture opening dimensions for the rear door (if applicable), tail lamp pocket, and deck lid aperture. Note gaps and flushness.
- R&I plan: Typically includes rear bumper cover, tail lamp, wheel opening molding/splash shield, belt moldings, roof drip trim, and on sedans/crossovers, the rear door for access and jamb protection. Remove glass only if required for access or to avoid heat/impact risk.
- Consumables and corrosion plan: List epoxy primer, weld-thru primer for any inner welds, OEM-style seam sealer (beadable and sprayable), cavity wax and wands, panel adhesive/foam only if specified by OEM for non-structural baffles.
- Photos and documentation: Photograph damage mapping, initial measurements, and any sensor bracket mounting points. Note any prior refinish or marginal adhesion in jambs or quarter-to-roof seams.
Time planning (ranges vary by make/model and severity):
- Quarter outer skin metal repair: 18–26 hours for heavy but repairable damage.
- Set up, anchoring, pulling, and measure: 3–5 hours (including live checks throughout).
- Seam sealer removal/reapplication and texture match: ~1 hour (more if complex beads).
- Adjacent panels R&I and minor corrections: 5–12 hours (tail lamp pocket, bumper cover fit, door R&I/adjust, trim).
- Finish, prime, and block to paint-ready: 6–10 hours depending on metal finish quality.
Real-world totals frequently land around 30–50 hours when the quarter is salvaged instead of replaced. Regional labor policies differ; itemize each step with supporting measurements and pictures.
2) Set Up to Pull and Measure: Control Before Force
Force without control just moves the damage. Anchor the body, pre-plan pull vectors, and verify with live measurements.
- Anchoring: Secure the vehicle on a bench or frame rack with pinch weld clamps and secondary restraints. Confirm level.
- Reference zero: With suspension settled or supported per OEM instructions, lock in datum lines. Use a laser or string line to establish centerline and a horizontal datum for repeatable checks.
- Pull plan: Identify primary impact direction and the locked areas (crowns). Set pull towers to work along the original force vectors, not perpendicular. Stage multiple light pulls rather than one heavy pull.
- Measurement during pulls: Alternate pull and measure cycles. Use a tram gauge for opening dimensions and a 3D system or digital protractor/laser for monitoring tail lamp pocket squareness and quarter flange angles. Track deviations in a simple chart.
- Attachment points: Where possible, weld tabs or stud washers in rows that align with the damage flow. For thin skins or sensitive areas, deploy glue pull tabs with a bridge puller or bar to spread load.
Tip: Control the reaction points with adjustable stands and soft pads at rocker and wheelhouse areas. If you flex the roof or door opening to achieve quarter movement, you will chase fitment later.
3) Metal Work Sequence: From Gross Shape to Planish
Work from structural alignment to surface refinement. The order matters.
- Relieve the crowns: Before pulling lows, knock down highs with a body hammer and appropriate dolly off-dolly. Slappers and spoons help distribute blows, especially on wide crowns.
- Gross pulls: Use a stud welder with washer tabs, wiggle wire, or keys combined with a pull bar/bridge. For broader pulls, a wide foot or footed pull plate reduces point-loading. Glue pulling is effective on outer skins where welding is risky—use PDR-specific glue and tabs with a temperature-controlled gun, not an open flame.
- Heat management: Avoid torch heating of body panels, especially near adhesives, foams, and high-strength steels. If shrinking is needed, a stainless shrinking disc or induction heater provides controlled, localized heat. Track temperature with an infrared thermometer. On mild steel, keep panel temps generally under 650–700°F for shrinking; avoid quenching HSS/boron structures.
- Rebuild body lines: Once the gross shape is back, reestablish feature lines before final lows. Use a profile gauge and paper templates mirrored from the opposite side to guide line height and curvature.
- Tail lamp pocket trough: This area often barrels or twists. Use narrow toe dollies and curved spoons. Verify vertical and horizontal datums with a small square, digital angle gauge, and a ruler. Correct pocket flange roll before finalizing quarter skin shape.
- Wheel opening and flange: Clamp a contouring dolly behind the lip and work the flare with a slapper to avoid thinning. Confirm arc symmetry with a template traced from the opposite side.
- Planishing: Once within 1–2 mm, refine with light hammer-on-dolly to tighten highs and a thin skim of filler later. Don’t chase perfection with excessive heat or overworking that stretches the panel.
Repair torn or cracked edges before final planishing. Dress welds flush and immediately coat bare steel with epoxy to prevent flash rust while you proceed.
4) Adjacent Panels, Jambs, and Blend Strategy
Quarter work touches many panels. Handling them early prevents rework.
- Door R&I and jamb protection: On four-doors, remove the rear door for access and to avoid damaging edge paint. Tape edges with double layer (foam tape plus refinish tape) and use door socks or edge guards where doors remain installed.
- Adhesion risks in jambs: Test with a tape pull at 45°. If paint lifts easily, consider localized stripping and proper substrate prep instead of hoping a blend will stick. Prior delamination will worsen with heat and impact.
- Gaps and flushness: Align quarter-to-door, quarter-to-bumper, and quarter-to-roof transitions before filler. Document final gap measurements (e.g., 3.5–4.5 mm typical) for the file.
- Blend decisions: Metallics and pearls commonly need blending into the rear door and bumper cover, sometimes the roof sail panel. Agree on blend panels with the painter before you lock your estimate. If the painter elects not to blend, ensure color match plan (spray-out cards) is in place.
- Tail lamp and bumper test-fit: Trial fit the lamp and bumper cover once the metal is close. Correct pocket depth and clip ledges now; plastic covers won’t hide a twisted pocket.
Note: Household “hot water and plunger” tricks don’t apply to collision-distorted quarters. Use controlled pull systems and proper adhesives for glue pulling.
5) Refine to Paint-Ready: Filler, Seam Sealer, and Protection
Quality metalwork reduces filler thickness and sanding time. Aim for a uniform skim.
- Filler work: After epoxy on bare steel, apply a thin polyester filler skim over the repair area. Block with long boards: 80 grit to shape, then 120–180 to refine. Guide coat between grits to read highs/lows. Finish with polyester glaze and 220–320 grit as needed.
- Feather and prime: Feather OE finishes back with 320–400 in preparation for primer. Use 2K high-build where necessary; block again with guide coat to finalize straightness.
- Seam sealer: Remove old sealer cleanly and replicate OEM beads. Use a pneumatic gun with shaped tips or brushable/sprayable seam sealers to match texture in gutters and wheelhouse seams. Allow full cure per TDS before topcoat.
- Inner cavity protection: After paint and bake, flood the quarter cavity, wheelhouse, and pocket areas with cavity wax using wand tips. Hit weld seams and flanges thoroughly.
- Hardware and clips: Replace any distorted U-nuts, plastic clips, and foam isolators. Loose hardware telegraphs into squeaks and panel read-through.
Document seam sealer bead type/size and post-repair cavity wax application for the final file. It helps justify materials and protects your comeback rate.
6) ADAS Sensor Bracket Checks and Calibration Prep
Many vehicles place blind-spot radar or side radar behind the quarter panel or bumper cover. The sensor bracket alignment is critical. You don’t need to perform the calibration in-house to ensure it will pass; you do need to verify bracket geometry.
- Identify the system: Confirm if the vehicle uses radar in the quarter or bumper corner. Check OEM repair info for bracket specs, target distances, and allowable tolerances.
- Bracket inspection: Before and after metal pulls, check the bracket base for kinks, torn studs, or distorted mounting flanges. Straighten or replace as required—don’t “bend to fit” plastic covers.
- Measure bracket plane: Use a digital angle gauge and a straightedge to capture pitch and yaw relative to the body datum. A cross-line laser can project a reference off the rocker or roof rail. Record deviation in degrees.
- Depth and offset: Measure the bracket face to a fixed point (e.g., tail lamp pocket edge) with a tram or calipers to confirm depth hasn’t shifted.
- Corrections: Shim only where OEM permits; otherwise, correct the sheet metal behind the bracket. Don’t elongate sensor mount holes unless specified.
- Calibration prep: After reassembly, perform a pre-scan, schedule static/dynamic calibration per OEM, and attach your bracket measurements and photos to the RO. If sublet, include your notes so the calibrator understands what was corrected.
Quick Checklist Before Sending to Paint
- All structural and opening measurements back to spec and documented.
- Tail lamp pocket square; lamp test-fit flush with uniform gap.
- Quarter-to-door and quarter-to-bumper gaps/flushness verified.
- Body lines rebuilt and matched to opposite side templates.
- Seam sealer replicated to OEM size/texture; fully cured.
- Bare steel sealed with epoxy; filler skim thin and uniform.
- Guide coat blocked flat; no low spots or sand scratches telegraphing.
- Sensor bracket angles/depth measured and recorded; pre-scan complete.
- All adjacent panels R&I labeled, protected, and ready for painter.
- Estimate and photos updated to reflect all labor and materials.
FAQs
When do you repair a quarter instead of replacing it?
Repair is viable when the outer skin is stretched within controllable limits, inner structures are intact or repairable, and OEM procedures don’t mandate replacement for the specific damage location. If the sail panel or roof seam is torn through multiple layers, or if high-strength/press-hardened members are kinked beyond allowable straightening, replacement may be the correct choice. Always consult OEM repair information.
Glue pulling vs. stud welding: which should I use?
Glue pulling with PDR tabs keeps the panel clean (no burn-through) and works well on thin outer skins and broad lows. It’s ideal early for test pulls and where heat could damage backside components. Stud welding offers stronger purchase on heavy damage and for localized crown control but introduces heat and the need for corrosion protection. Many techs alternate: start with glue to move metal, switch to studs for precision, and finish with planishing.
How much heat is safe during shrinking?
Use the least heat required. Prefer a shrinking disc or induction heater for controlled heat. Keep general panel temperatures under ~650–700°F when shrinking mild steel and avoid open-flame torches near adhesives, foams, or HSS. Track with an IR thermometer. Don’t quench high-strength steels; allow air cooling per OEM guidance. If in doubt, avoid shrinking and instead refine with mechanical methods.
How do I justify time on a repair like this?
Break the job into line items: measure and documentation, anchoring and pull setup, pull/measure cycles, outer skin metal work, tail lamp pocket correction, door/bumper/lamp R&I and adjustments, seam sealer removal/recreation, corrosion protection, ADAS bracket checks, and finish-to-prime. Attach photos and measurement records. Typical defended totals for substantial quarter repair often fall in the 30–50 hour range, depending on severity and adjacent panel involvement.
Do I need to blend adjacent panels?
Metallics/pearls commonly require blends into the rear door and bumper cover; sometimes the roof sail panel as well. Decide early with your painter and write the estimate accordingly. If a no-blend strategy is chosen, plan for spray-outs and potential tinting time. Quality metal alignment and uniform substrate prep reduce color mismatch risk but do not eliminate the need to blend for certain colors and finishes.
Shop Automotive Paint & Finishing Tools
As you move from metal work to primer, seam sealer, and final blocking, see our Automotive Paint & Finishing Tools for the equipment that supports clean, repeatable results.
- Spray guns, cups, and regulators for epoxy, 2K primer, and sealer application.
- Long boards, sanding blocks, guide coat tools, and abrasives for straight panels.
- Seam sealer applicators and cavity wax wands to match OEM protection.
The Toolsource Technical Team blends decades of real-world automotive service experience with up-to-date technical research. Our writers collaborate with professional mechanics, shop owners, and diagnostic specialists to deliver practical, workshop-ready guidance you can trust.

Follow us on social media