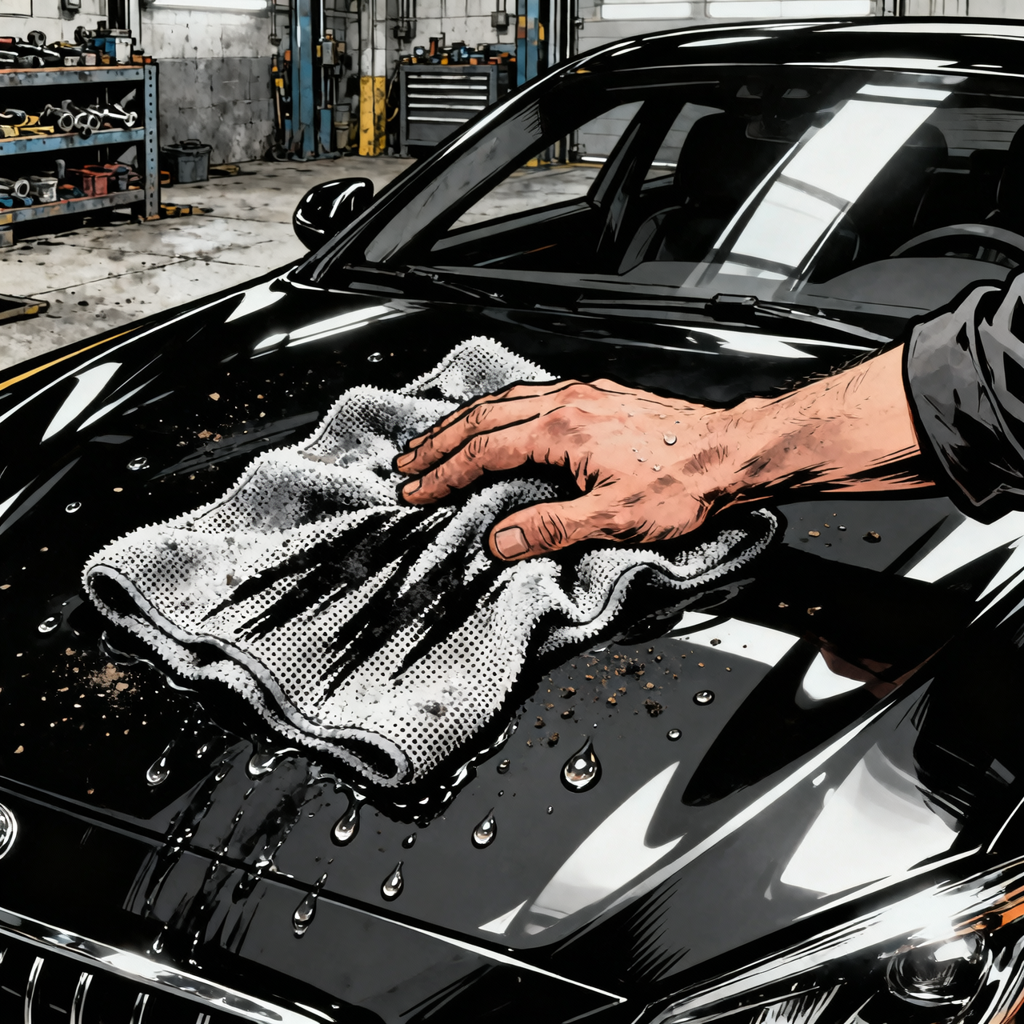
Streaks on black paint after a wash usually come from one of three sources: residue left on the surface, contaminated or damaged drying towels, or paint marring that was previously masked by wax or sealant. This guide outlines fast diagnostics and practical steps to correct the issue and prevent it from recurring.
What causes black paint to streak after a wash?
- Towel contamination or damage: Microfiber clogged with fabric softener, dryer sheet residue, silicone (e.g., from hair products), or detergent fragrances can smear and leave dark or rainbow-like streaks. High heat in dryers can melt fiber tips, reducing absorbency and dragging residues.
- Leftover wash residue: Incomplete rinsing, hard water minerals, or using too little rinse water can leave surfactant streaks or water spotting that show dramatically on black paint.
- Protection removed, marring revealed: Using a strong or “stripping” shampoo can remove waxes/sealants. Without that sacrificial layer, existing swirls and micro-marring become obvious and can appear as streaks or dull patches when you wipe.
- Technique-related smearing: Dragging a saturated towel with no lubrication, overworking one towel across too many panels, or working in sun/warm panels can lead to streaking.
- Drive-through/brush washes: Previous rotary/brush contact can load the clearcoat with wash-induced marring; once the vehicle is thoroughly cleaned, the true condition becomes visible.
Quick field tests to pinpoint the problem
- Finger-swipe test: On a cool, clean panel, lightly swipe a clean fingertip across a streaked area. If the swiped path looks deeper black, you’re likely dealing with smearable residue (towel or surfactant), not etched defects.
- Spot test with a fresh towel and a drop of water: Use a brand-new, high-quality microfiber. Add a single drop of water or detail spray to the streak and lightly buff. If the streak clears, your existing towels are contaminating.
- Air-dry panel test: After rinsing, allow a small panel to air dry without touching it. If streaks are absent on the air-dried panel but present where you wiped, towels or technique are the cause.
- Light inspection: Under strong LED or sun, look for uniform, directional scratches (front-to-back or circular). If present, the paint is marred and requires polishing. If the surface looks uniform but dull or smeary, look to residue/towels first.
Step-by-step recovery wash (when the paint is clean but streaky)
Use these steps when your diagnostics point to residue or towels as the culprit.
- Prepare clean tools: Use freshly laundered, residue-free drying towels and wash mitts. If you’re unsure about your towels, use new ones for this recovery wash.
- Rinse thoroughly: Cool the panels with a full rinse. Use a high-volume “sheeting” rinse to reduce standing water. If possible, use deionized/softened water for the final rinse.
- Panel rewash (optional): If you suspect leftover surfactant, rewash with a pH-neutral shampoo per label, then rinse thoroughly. Avoid high-alkaline soaps unless intentionally stripping protection.
- Use a drying aid: Mist a quality detail spray/drying aid onto a wet panel. This reduces surface tension, adds lubrication, and helps prevent smear marks.
- Dry with proper technique: Use a clean, high-GSM twisted-loop or plush microfiber drying towel. Lightly lay and pull, or blot; avoid dragging pressure. Flip to a dry side frequently. Switch towels as soon as one feels saturated.
- Follow-up wipe: For any faint streaks, use a second, clean microfiber with one spritz of detail spray to lightly buff. Work shade/cool panels only.
- Final inspection: Under good lighting, confirm streaks are gone. If streaks persist despite new towels and drying aid, you’re likely seeing underlying marring that needs polishing.
Decontaminate and care for microfiber towels (stop the streaks at the source)
Microfiber performance lives or dies in the laundry room. Improper washing and drying is the number one cause of streaking after a wash.
Laundering best practices
- Detergent: Use a dedicated microfiber detergent or a dye/fragrance-free detergent. Avoid optical brighteners and enzymes when possible.
- No fabric softener or dryer sheets: These deposit residues that cause smearing and reduce absorbency.
- Rinse booster: Add white vinegar or a small amount of citric acid to the rinse cycle to help strip detergent and mineral residues. Do not mix with bleach.
- Separate loads by task: Wash paint-dedicated towels separately from wheel, engine, or interior towels. Separate wash mitts, drying towels, and polishing/buffing towels to prevent cross-contamination.
- Machine settings: Warm water wash, extra rinse. Spin medium to high to remove water.
- Drying: Best is hang/air dry. If machine drying, use low/no heat (delicate/air tumble). Never use dryer sheets. Remove promptly and store clean in sealed bins or bags.
Decontamination for compromised towels
- Hot soak: Soak towels in warm water with microfiber detergent for 30–60 minutes. For heavy buildup, add a small amount of distilled white vinegar.
- Deep wash: Run a full wash with microfiber detergent, then an extra rinse cycle.
- Absorbency check: Drip test: water should quickly absorb into the towel. If it beads or the towel “pushes” water, fibers may be heat-damaged; demote those towels to non-paint tasks.
Clean the machines
- Run a washer self-clean cycle with hot water and an empty drum using a washing machine cleaner or white vinegar (never mix vinegar with chlorine bleach). This removes softener and silicone residues that can transfer onto your towels.
- Wipe the dryer drum and lint filter housing to remove any residual sheet/softener films if you previously used them for household laundry.
If it’s not residue: correct the marring and restore gloss
If fresh towels and proper drying don’t solve it, the paint likely has uniform marring that appears streak-like on black. This often shows up right after a strong wash that removed wax/sealant.
Test-spot correction workflow (least aggressive first)
- Decon prep: Wash, then decontaminate with clay and lubricant if the surface feels rough. Rewash or at least re-rinse.
- Cleaner wax/All-in-one by hand: On a small, representative area, apply a cleaner wax or AIO with light pressure and buff off with a clean microfiber. Inspect. If improved but not perfect, step up.
- DA polisher + finishing polish: Use a dual-action polisher with a finishing foam pad and a fine polish. Work small sections, 3–4 slow overlapping passes. Wipe off and inspect under strong lighting.
- DA + light compound (if needed): If defects persist, switch to a light/medium cut compound with a polishing pad or mild cutting pad. Follow with a finishing polish to refine.
- Protect: Apply a sealant or consumer-grade ceramic coating per instructions. This restores slickness, makes drying easier, and helps mask fine micro-marring.
Technique tips for black paint
- Keep pads clean and swap frequently. A loaded or hot pad can haze soft clearcoat.
- Use minimal product; excess can smear and complicate wipe-off, especially on soft black.
- Control heat and dust: work cool panels indoors if possible.
Prevent it next time: wash, dry, and protect the right way
- Pre-wash: Use a foam pre-soak or rinseless pre-spray to remove loose grime before contact. This reduces marring risk.
- Two-bucket or safe rinseless method: Use grit guards and frequent mitt rinses. Dedicated wheel tools separate from paint tools.
- Rinse thoroughly: High-volume rinse, then sheet water off. If water is hard, consider a final DI rinse or blow-off with filtered air to reduce spotting.
- Drying aid + proper towels: Use a quality drying aid and high-GSM twisted-loop towels. Pat and pull; avoid pressure. Change towels as soon as they saturate.
- Inspect and top up protection: After drying, apply a spray sealant or ceramic booster to maintain slickness and ease of future drying. Reapply wax/sealant or coating maintenance as scheduled.
- Avoid brush washes: Touchless or hand wash only. Rotary brushes can rapidly mar black paint.
Quick checklist before your next wash
- Clean, residue-free microfiber drying towels ready (no softener, no dryer sheets)
- Dedicated microfiber detergent; vinegar/citric acid for rinse booster
- pH-neutral car shampoo and a quality drying aid/detail spray
- Two buckets with grit guards, separate mitts for paint and wheels
- Strong LED light for inspection; optional filtered air blower for drying
FAQs
Do I need to rewash the car or just re-dry?
If a finger swipe reveals deeper black and a fresh microfiber plus a spritz of detail spray removes streaks, you can often re-rinse and re-dry with clean towels. If surfactant residue remains (suds film, grabby feel), rewash and rinse thoroughly before drying.
Can I machine-dry microfiber towels?
Yes, but use low or no heat and never use dryer sheets. High heat can melt fibers, reducing absorbency and causing streaking. Air drying is safest. If using a dryer, clean the drum and lint housing to remove softener residues from household laundry.
What if I never used softener but still get streaks?
Residues can transfer from previous loads, dryer sheets used on other laundry, or silicone-containing products like hair conditioners. Clean the washer (self-clean cycle with hot water) and wipe down the dryer drum. Then deep-clean your microfibers and separate paint-only towels from everything else.
Why did the paint look great until this wash?
A strong or “reset” type shampoo can remove waxes and sealants. Once that sacrificial layer is gone, existing micro-marring becomes visible. If towels/technique are ruled out, perform a test-spot polish and then re-protect.
How can I tell the difference between streaks and scratches?
Residue streaks wipe away with a clean microfiber and a drop of water or detail spray. Scratches and uniform marring do not. Under strong light, scratches have defined edges/direction; residue looks smeared or patchy and changes with gentle buffing.
What towels work best for drying black paint?
High-quality, high-GSM twisted-loop or plush drying towels with soft edges. Use multiple towels per car, avoid over-saturating one towel, and pair with a drying aid. Demote any towel that starts to repel water or feels grabby to non-paint duties.
Shop Automotive Paint & Finishing Tools
Need to correct marring or stop smear marks after a wash? Explore Automotive Paint & Finishing Tools for the equipment that supports safe drying, inspection, and paint correction.
- DA polishers, backing plates, and foam/microfiber pads for correction and finishing.
- Compounds, polishes, and cleaner wax/AIO options for test spots and refinement.
- Inspection lights, clay and prep accessories, and high-quality microfiber towels.
The Toolsource Technical Team blends decades of real-world automotive service experience with up-to-date technical research. Our writers collaborate with professional mechanics, shop owners, and diagnostic specialists to deliver practical, workshop-ready guidance you can trust.

Follow us on social media