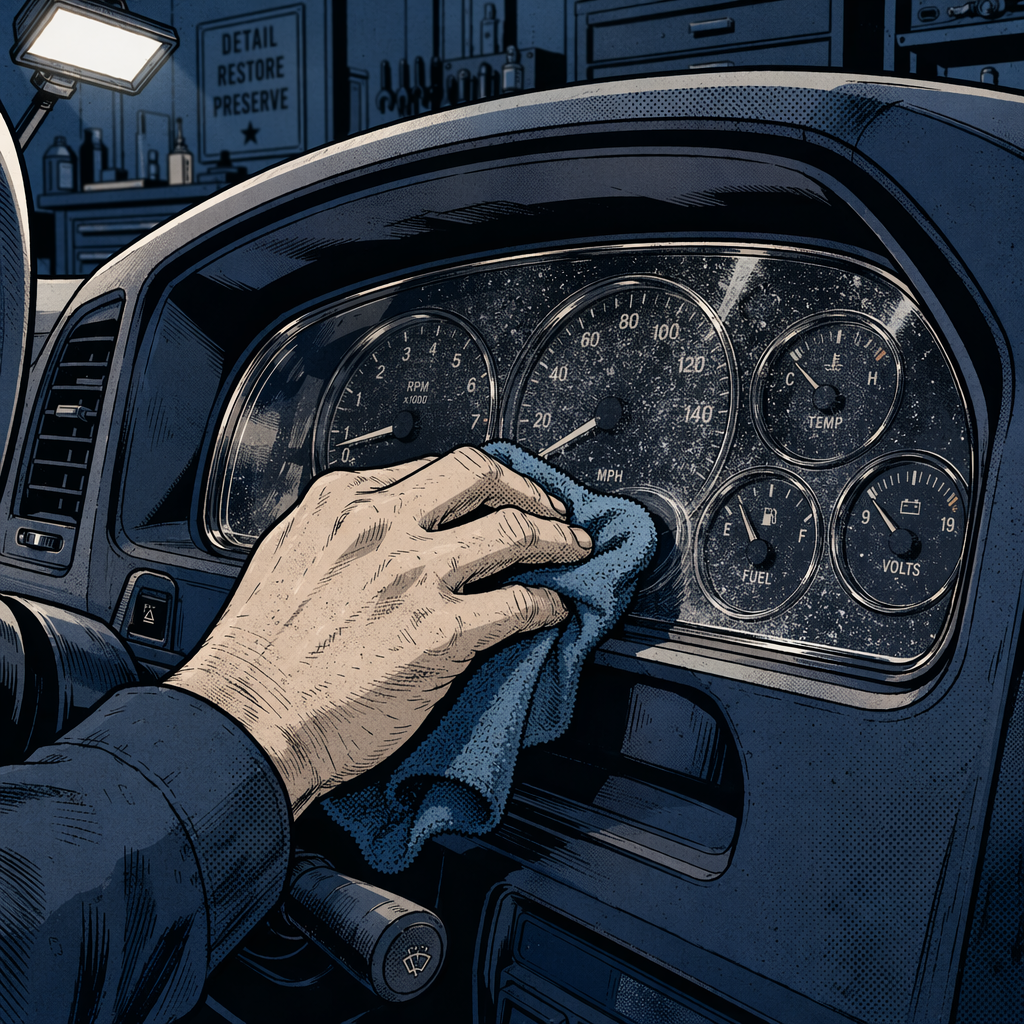
When you spot a constellation of cloudy dots or hazy patches across your gauge cluster, you’re likely dealing with chemical etching—one of the most common forms of dashboard damage in professional detailing and DIY cleaning gone wrong. Whether it’s overspray from all-purpose cleaner (APC), glass cleaner, alcohol, or even air freshener, many common automotive chemicals can permanently etch the delicate anti-glare and UV-protective coatings on instrument panel plastic. The good news is that most chemical damage can be polished out with the right products and technique, though you’ll need to understand what you’re actually fixing—and what you’re sacrificing—before you start buffing.
Understanding What Happened: Chemical Etching vs. Surface Residue
Before you grab a polish and start working, you need to determine whether you’re dealing with surface contamination or actual chemical etching. The pattern of damage tells the story: if you see a spray pattern of dots radiating from a central point, someone applied cleaner directly to the cluster and either let it dwell too long or used an incompatible chemical. Common culprits include isopropyl alcohol above 70% concentration, ammonia-based glass cleaners, strong degreasers, APC applied without proper dilution, and even some scent sprays.
Start with a simple test. Take a clean microfiber cloth dampened with warm distilled water and gently wipe the affected area. If the spots disappear when wet but return as the surface dries, you might have dried cleaner residue sitting on top of the plastic. If the marks remain visible even when wet, you’re looking at etched plastic where the chemical has eaten into the coating or the substrate itself.
Gauge cluster lenses aren’t just clear plastic—they typically feature specialized coatings that serve specific purposes. The anti-reflective coating reduces glare from sunlight and dashboard reflections, making gauges readable in bright conditions. UV protection prevents the plastic from oxidizing, yellowing, and hazing over time. When chemicals etch the surface, they’re destroying these coatings. This is critical to understand because polishing will remove what’s left of these coatings. Your cluster will look clear again, but you’ll have more glare and the plastic will be more vulnerable to future UV damage.
Selecting the Right Plastic Polish and Tools
Not all polishes are created equal, and using the wrong product or technique can make the problem worse. For gauge cluster restoration, you want a polish specifically formulated for clear plastics—not paint polish, not rubbing compound, and definitely not anything with heavy abrasives. The most consistently recommended products by professional detailers include Meguiar’s PlastX, Novus Plastic Polish (usually the #2 fine scratch remover), Griot’s Garage plastic polish, and for light scratches on acrylic, Polywatch (originally designed for watch crystals).
Meguiar’s PlastX is the workhorse of the industry—it’s widely available, reasonably priced, and formulated with micro-abrasives that cut through light etching without being aggressive enough to cause new scratches. For deeper etching, some technicians start with Novus #2 and finish with Novus #1 (plastic clean and shine). If you’re dealing with very light damage, even a final-stage paint polish like Meguiar’s M205 can work, though it’s not optimized for plastic.
Tool selection matters as much as product choice. You’ll need several edgeless microfiber cloths—the absence of stitched edges prevents new scratches as you work around the recessed gauge faces and tight corners. A yellow or white foam applicator pad works well for applying polish to larger flat areas. For edges, tight spaces, and around individual gauge bezels, wrap a microfiber cloth around your index finger for precise control. Avoid terry cloth despite old-school recommendations—modern microfiber is far less likely to introduce new scratches.
If you’re tackling this repair professionally or have multiple clusters to restore, a dual-action polisher with a soft foam pad can speed the process, but hand application gives you more control and less risk of heat buildup that could warp the plastic or damage gauges behind the lens.

Step-by-Step Polishing Technique
Proper technique is everything when polishing gauge cluster plastic. Rushing the job or applying too much pressure will create new problems, potentially even melting the plastic through friction heat. Start by ensuring the cluster is cool—if the vehicle has been running or sitting in the sun, let it cool completely. Mask off any areas you don’t want to accidentally polish, particularly matte-finish trim pieces around the cluster bezel.
Apply a small amount of plastic polish to your foam applicator or microfiber cloth—a dime-sized amount is usually sufficient to start. Work in small sections, roughly 2×2 inches at a time. Using light to moderate pressure, buff in small circular motions, overlapping each pass by about 50%. The key word here is patience. You’re not trying to scrub the damage out; you’re gradually abrading the surface to level it.
As you work, you’ll notice the polish beginning to dry and haze. This is normal. Continue buffing until the polish becomes mostly transparent and starts to break down. For PlastX, this usually takes 30-60 seconds per small section. Then wipe away the residue with a clean microfiber cloth, inspecting your progress. Most chemical etching requires multiple passes—typically three to five applications in the same area before the damage is fully removed.
For edges and corners where the cluster lens meets the bezel, switch to the finger-wrap technique: fold a microfiber cloth over your index finger, apply a small amount of polish, and carefully work the edge with controlled circular motions. These areas are most prone to overworking, so check your progress frequently.
After you’ve removed the visible etching, perform a final pass with either a clean application of the same polish or a finishing polish like Novus #1. This removes any micro-marring and leaves the surface as clear as possible. Finish by wiping the entire cluster with a clean, dry microfiber to remove all polish residue.
When Polishing Isn’t Enough: Replacement Options
Sometimes the damage is too deep for polishing to resolve, or the etching has penetrated through the coating into the base plastic itself. If you’ve gone through multiple polishing sessions and the marks remain visible, or if the plastic has developed a cloudy haze across the entire surface, you’re looking at replacement rather than restoration.
Gauge cluster lens replacement varies significantly by vehicle. Some manufacturers design the cluster with a replaceable lens cover that can be carefully separated from the gauge assembly—these are the easiest and least expensive to fix. Others integrate the lens into the cluster housing, requiring complete cluster replacement. OEM replacement through the dealer is typically the most expensive option but guarantees correct fit and coating specifications. Aftermarket suppliers offer less expensive alternatives, though quality can vary.
Before committing to replacement, check for used clusters at automotive recyclers or online marketplaces. Many wrecking yards now offer cluster-specific inventories with photos. Just verify the mileage disclosure regulations in your jurisdiction—some areas require documenting any cluster replacement that changes the displayed mileage.
If someone else caused the damage—a detail shop, car wash, or service center—document everything before attempting repair yourself. Take clear photos showing the spray pattern and extent of damage, note the date and circumstances, and keep all related receipts. Once you start polishing, you’re altering evidence. Most professional shops will acknowledge responsibility for chemical damage when presented with clear documentation, and they should cover either professional restoration or replacement parts and labor.
Prevention: Protecting Gauge Clusters from Chemical Damage
Once you’ve restored your cluster, preventing future damage becomes a priority. The best defense is using only appropriate cleaners on gauge cluster plastic. Avoid any product containing ammonia, alcohol above 50% concentration, or strong solvents. Instead, use dedicated plastic-safe interior cleaners or even products designed for optical lenses and eyeglasses—these are formulated to clean without damaging coatings.
Application method matters as much as product selection. Never spray cleaner directly onto the gauge cluster. Instead, spray a small amount onto your microfiber cloth, then wipe the cluster. This prevents overspray from seeping behind the lens, dripping into gauge mechanisms, or pooling in corners where it can dwell and etch. Use minimal product—gauge cluster plastic rarely needs heavy cleaning since it doesn’t accumulate the oils and grime that other interior surfaces collect.
For shops that regularly detail interiors, train staff to recognize gauge clusters as a no-spray zone. Many detail-related chemical damage incidents happen when a technician liberally applies APC or degreaser to the dashboard and gauge area without considering the sensitivity of the cluster lens. If you’re having your vehicle professionally detailed, specifically mention that the cluster should be cleaned with a damp cloth only, or better yet, not touched at all if it’s already clean.
Gauge cluster screen protectors offer an additional layer of defense. Similar to phone screen protectors, these thin films adhere to the cluster lens and can be replaced if damaged. They’re particularly valuable for vehicles that will be frequently detailed, leased vehicles where you’ll need to return the car in original condition, or any high-value vehicle where replacing the cluster would be expensive. Installation requires careful alignment and a dust-free environment, but once applied, they’re nearly invisible and provide excellent protection against both chemicals and physical scratches.
Quick Reference: Gauge Cluster Restoration Checklist
- Test first with damp microfiber and warm water to rule out surface residue
- Verify damage is etching (visible when wet) vs. dried cleaner (disappears when wet)
- Gather supplies: plastic polish, edgeless microfiber cloths, foam applicator
- Work in cool conditions, mask surrounding trim if necessary
- Apply small amounts of polish, work in 2×2-inch sections
- Use light pressure with circular motions, 30-60 seconds per area
- Wipe clean and inspect after each pass; repeat 3-5 times as needed
- Use finger-wrap technique for edges and tight spaces
- Finish with clean polish pass to remove micro-marring
- Consider screen protector film after restoration to prevent future damage

Frequently Asked Questions
Can I use regular car polish or rubbing compound on gauge cluster plastic?
No. Paint polishes and compounds are formulated for much harder surfaces and contain abrasives that are too aggressive for soft plastics. They’ll create more scratches than they remove. Always use a product specifically labeled for plastic or acrylic.
Will polishing remove the anti-glare coating permanently?
Yes. When you polish away chemical etching, you’re removing the damaged coating along with the damage. The cluster will be clear but will have more glare than original. This is an acceptable trade-off for most drivers, but you should know what you’re getting. The only way to restore the original coating is to replace the lens.
How do I know if the damage is too deep to polish out?
If you’ve done three to five polishing sessions with a quality plastic polish and the marks are still clearly visible, or if the entire lens has developed a uniform haze, the damage has likely penetrated beyond what polishing can fix. At that point, replacement is your only option for a clear lens.
Is isopropyl alcohol safe for cleaning gauge clusters?
Low concentrations (below 50%) used sparingly might be safe, but higher concentrations—especially the 70% and 91% commonly used for disinfecting—can damage coatings and even craze or cloud the plastic itself with extended contact. It’s best to avoid alcohol entirely and use plastic-safe cleaners or just a damp microfiber with water.
Can I prevent moisture from getting behind the gauge cluster lens?
Moisture behind the lens usually indicates a seal failure or HVAC system issue allowing humid air to reach the cluster area. It’s not normal and suggests either a manufacturing defect or damage to the cluster housing. If you see moisture condensation inside the lens, have the HVAC system and firewall seals inspected—simply replacing the cluster won’t solve the underlying problem.
Will a screen protector affect gauge visibility or create glare?
Quality gauge cluster screen protectors are designed to be optically clear and shouldn’t affect visibility when properly applied. Some even include anti-glare properties that can improve readability. The key is getting all air bubbles out during installation and ensuring perfect alignment so the protector doesn’t create distortion at viewing angles.
Recommended Products for Gauge Cluster Restoration
Restoring chemical etching from your gauge cluster requires the right plastic polish and application tools. Browse our Car Care – Polishes and Waxes selection to find the polishes and microfiber cloths you’ll need for this detailed work.
- Plastic-specific polishes formulated for soft surfaces without aggressive abrasives
- Edgeless microfiber cloths and foam applicator pads for scratch-free application
- Finishing polishes to remove micro-marring and restore clarity

The Toolsource Technical Team blends decades of real-world automotive service experience with up-to-date technical research. Our writers collaborate with professional mechanics, shop owners, and diagnostic specialists to deliver practical, workshop-ready guidance you can trust.


Follow us on social media