If your drained oil looks like metallic paint or chocolate milk, the engine is telling you what failed and what will fail next. A metallic sheen points to internal wear debris. A milky or frothy appearance points to coolant contamination. Often you will see both, which indicates the bottom end has been damaged while coolant snuck into the crankcase. This article lays out practical, technician-grade steps to identify the source, limit further damage, and choose the right repair path.

z-nla Replacement Blade for AT3391 Oil Filter Cutter
Mfg: K-Line Industries
Part #: AT50102G


Compressed Air Filter Kit - Sub-Micronic (M30) 1/4 NPT
Mfg: Motor Guard
Part #: M-45KIT
Identify What You Are Seeing: Metal vs Coolant, and What Each Color Means
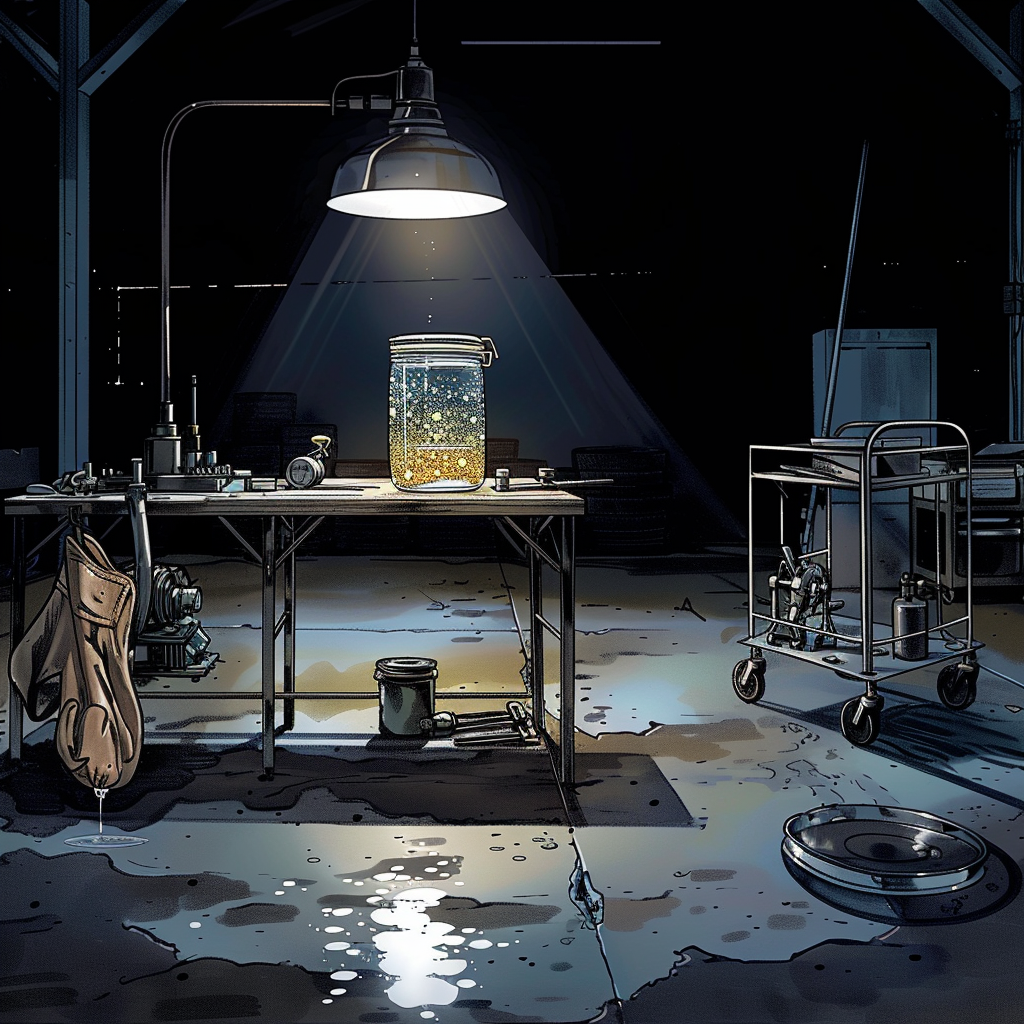
Start by characterizing the contamination. Use a clean, clear glass jar and good lighting.
- Metallic glitter or shimmer: Reflective flakes that catch light. Yellow or bronze tones usually indicate bearing overlay material from rod, main, or cam bearings. Silvery ferrous flakes can be from cam lobes, lifter rollers, timing chains, pumps, or steel-backed bearings.
- Milky, frothy, or peanut butter texture: Oil and coolant emulsified. This can be tan to light brown. Skim milk appearance points to recent mixing; thick peanut butter texture suggests long-running contamination.
- Settling behavior: Let the sample sit for 10 to 15 minutes. Heavy metal will sink. Emulsified oil stays cloudy. Clear separation with a watery layer can indicate fuel or water that did not fully mix.
- Magnet test: Place a strong magnet against the outside of the jar and gently stir. Ferrous particles will migrate toward the magnet. Brass or copper bearing materials will not.
- Odor check: Raw fuel smell indicates dilution that thins oil and accelerates wear. Sweet odor from coolant confirms glycol presence.
Common sources to relate to what you see:
- Brass or copper colored glitter: Bearing overlay wear from rod and main bearings, possibly cam bearings where used.
- Silvery flakes: Steel wear from cams, lifters, timing chains, crankshaft, or cylinder walls. Aluminum glitter may point to piston skirts or housings.
- Milky oil without glitter: Head gasket, intake manifold gasket (where coolant crosses the intake), cracked head or block, or failed oil cooler. Short-trip condensation can cause slight milkiness but not a persistent heavy emulsion.
Stabilize the Situation and Collect Evidence Before You Start Wrenching
If you suspect heavy metal or coolant in the oil, do not run the engine again until you have evidence. Oil starvation and abrasive debris destroy bearings quickly.
- Shut down and secure: Disable fuel or ignition to prevent accidental starts.
- Capture a midstream sample: During the drain, fill a clean jar from the mid flow for visual and possible lab analysis. Avoid only the first or last drips.
- Cut the oil filter: Use an oil filter cutter or a large tubing cutter. Avoid grinders that shed metallic dust into the sample. Spread out the pleats and inspect for glitter, flakes, or bearing material. Note color and quantity.
- Check the coolant side: Look for oil sheen in the coolant reservoir or radiator. Note unexplained level gain or loss. Inspect for pressure in the reservoir after sitting cold, which may indicate combustion leakage.
- Scan for codes and data: Pull stored misfire, overheat, or low oil pressure codes. Review freeze frame data for coolant temperature and load during events.
- Document oil level and condition: Overfilled oil may be an attempt to quiet noise or compensate for pressure loss. Fuel dilution thins oil to the point of pressure drop and bearing damage.
Having physical evidence and baseline data reduces guesswork and avoids unnecessary disassembly.
On-Vehicle Tests to Separate Coolant Intrusion From Bottom-End Failure
Before you drop a pan or pull a head, run core tests that can quickly narrow your fault tree.
- Cooling system pressure test: Pressurize the system cold to spec and watch for pressure loss. Remove spark plugs and look for coolant in cylinders. Inspect the crankcase via the drain plug hole or borescope for drips at pressure. A pressure drop with external dryness may indicate internal leakage into oil.
- Combustion leak test (block test): Use a chemical tester over the radiator neck to check for combustion gases in coolant. A positive result points to a head gasket, cracked head, or block.
- Compression and leak-down tests: Uniform compression numbers suggest the bottom end is intact. Localized low compression adjacent cylinders with crossflow on leak-down point to head gasket breaches. Air heard in the coolant neck during leak-down suggests a combustion-to-coolant path.
- Mechanical oil pressure test: Install a calibrated gauge. Low hot idle pressure or slow rise on cold start can indicate worn bearings or a restricted pickup.
- Oil cooler isolation test: For engines with oil-to-water coolers, bypass or bench pressure-test the cooler to rule out cross-contamination. Many emulsions are cooler failures, not head gaskets.
- Acoustic checks: Use a stethoscope to differentiate bottom-end knock (deep and rhythmic with load) from top-end tick (faster with RPM). Knocks combined with metallic oil is a strong indicator of bearing distress.
These tests help you decide if the repair is a top-end gasket job, a cooler replacement, or a bottom-end overhaul or swap.
Targeted Inspections: What to Look for in the Pan, Bearings, and Valvetrain
If tests point toward internal damage, a limited inspection can confirm severity before you commit to a full rebuild.
- Drop the oil pan: Inspect the pan for glitter, chips, or bearing flakes. Check the oil pickup screen for debris. A restricted screen will starve the pump and bearings.
- Rod and main bearing spot checks: Mark cap orientation, remove one or two rod caps and one main cap following service manual procedures. Inspect shells for copper showing through, scoring, overlay fatigue, and wipe. Use Plastigage during reassembly to measure clearance and compare to spec.
- Crankshaft journals: Look for scoring and heat discoloration. Journal damage often requires grinding or replacement.
- Cam and follower inspection: Remove valve covers. Inspect cam lobes and journals for scoring. On engines with overhead cams, remove a cam bearing cap to check for transfer. Spalled lobes and wiped followers shed a lot of metal quickly.
- Timing set debris: Broken plastic guide material and chain rub marks add metal and plastic fines to the oil and can upset cam timing.
- Cylinder condition: Through spark plug holes, use a borescope to check for wash, scoring, or coolant puddling. Heavy wash suggests coolant or fuel ingress.
Confirming bottom-end health early prevents wasting time on head gaskets when the crank and bearings are already compromised.
Choose a Repair Path: Head Gasket, Cooler, Rebuild, or Replacement Engine
Once you know what failed, select the path that balances cost, time, and risk.
- Coolant in oil with good compression and oil pressure, no bearing glitter: Pressure test and replace the oil cooler if failed. If the cooler is integrated into a filter housing, install a new assembly. Flush both systems thoroughly.
- Coolant in oil with metallic glitter but bearings measure within spec on spot checks: Head gasket or cracked casting is likely. A top-end repair may be possible, but clean all oil passages and replace the oil pump to mitigate debris risk. Consider lab oil analysis to confirm debris load after repair.
- Metallic glitter with low oil pressure, bearing copper showing, or journal scoring: Plan for a full overhaul or a quality used or reman engine. Attempting a top-end only repair risks rapid repeat failure.
- Used engine swap: Source a verified low-mileage engine with compression and oil pressure documentation. Inspect under covers and, if practical, the pan before installation. Replace the rear main seal, timing set if marginal, water pump, and all accessible gaskets. Always install a new oil cooler or thoroughly flush an external cooler to prevent debris carry-over.
- Full rebuild: Send block, heads, and crank to a machine shop for cleaning and measurement. Typical operations include align hone, deck check, cylinder boring and honing, crank polish or grind, valve work, and cam bearings where applicable. Replace oil pump, bearings, timing components, and all gaskets and seals. Measure everything with micrometers and bore gauges and verify clearances with Plastigage during assembly.
A word on flushes: Chemical flushes cannot reverse bearing damage or remove embedded metal from bearing surfaces. Flushing may help identify residual contamination after a repair, but it is not a fix for mechanical damage.
Cleaning and Reassembly Practices That Prevent a Repeat Failure
If you repair or rebuild the existing engine, get serious about cleanliness and lubrication on reassembly.
- Deep cleaning: Hot tank or ultrasonic clean the block and heads. Brush every oil gallery with dedicated brushes and solvent. Remove and replace gallery plugs where practical to ensure passage cleanliness.
- Replace the oil pump: Even minor debris can score pump gears and bypass valves, compromising pressure.
- Replace oil-to-water coolers: Many coolers trap debris that will recontaminate fresh oil. If you must reuse an external air-to-oil cooler, solvent-flush, backflush, and blow dry repeatedly, or replace it.
- Use assembly lube and prime the oiling system: Prelube bearings, cam lobes, and lifters. Spin the pump with a priming tool or crank without fire to achieve oil pressure before first start.
- Gasket surfaces and fasteners: Verify surface finish and flatness for head gaskets. Use new torque-to-yield head bolts where specified. Follow torque plus angle procedures exactly.
- Cooling system service: Replace the thermostat and radiator cap. Pressure test before initial start. Flush with distilled water until clear, then fill with the correct coolant type and strength.
- Break-in and early maintenance: Use appropriate break-in oil where required. Vary RPM and avoid heavy load on initial runs. Monitor oil pressure and coolant temperature continuously. Perform an early oil and filter change at 50 to 100 miles, then again at 500 miles. Cut open each filter to verify the debris trend is reducing to normal.
Quick Checklist: Before You Tear It Down
- Capture a midstream oil sample in a clear jar and perform a magnet test.
- Cut the oil filter with a dedicated cutter and inspect the media.
- Cooling system pressure test and combustion leak test.
- Compression and leak-down tests across all cylinders.
- Mechanical oil pressure test hot and cold.
- Decide on targeted inspection steps (pan drop, bearing spot checks) based on test results.
FAQs
Can I drive a vehicle that has glittery or milky oil?
No. Running the engine circulates abrasive metal and coolant, wipes the oil film, and accelerates bearing and cam damage. Tow it, test it, and repair it before further operation.
Could an oil additive make the oil look glittery without actual damage?
Some additives containing molybdenum disulfide can give a gray or dark sheen, but they do not produce bright, reflective brass or copper flakes. If you see a metallic sparkle, treat it as wear debris and investigate.
How do I tell a head gasket leak from a failed oil cooler?
Pressure-test the cooling system and check for combustion gases in the coolant. A cooler failure often cross-contaminates both systems without combustion gases and may present as sudden milkiness after a heavy towing or high load event. Bench pressure-testing the cooler or substituting a known-good unit is definitive.
Does overfilled oil cause bearing damage?
Yes. Overfilled oil can aerate and foam, which reduces effective oil pressure and film strength. Combined with high RPM or heat, that accelerates bearing wear. Overfilling is sometimes used to mask low oil pressure, so document the level you find.
Will repeated oil changes or a flush fix the problem?
No. Oil changes and flushes cannot restore damaged bearing surfaces or remove embedded debris. They are useful after repairs to trend contamination downward, but underlying mechanical faults must be corrected.
Should I replace catalytic converters after a coolant-in-oil event?
Coolant that enters the combustion chambers can coat and damage oxygen sensors and catalytic converters. After repairs, monitor fuel trims and catalyst efficiency codes. Replace affected sensors or converters if performance does not recover.
Shop Engine Diagnostic Tools
Ready to run the tests from this guide? Visit our engine repair tools category here for the gear used to confirm coolant intrusion, bearing wear, and oiling issues.
- Cooling system pressure testers and combustion leak (block) test kits.
- Compression and leak-down testers for cylinder sealing checks.
- Mechanical oil pressure gauges, oil filter cutters, and borescopes for inspection.
The Toolsource Technical Team blends decades of real-world automotive service experience with up-to-date technical research. Our writers collaborate with professional mechanics, shop owners, and diagnostic specialists to deliver practical, workshop-ready guidance you can trust.

Follow us on social media