A coolant leak near the front of the engine on a Ford 4.6L or 5.4L 2-valve Triton is one of the most common complaints on these platforms — and one of the most misdiagnosed. At first glance it looks like a thermostat gasket failure, and while that’s a reasonable starting point, the real villain in the overwhelming majority of cases is the plastic intake manifold coolant crossover. This guide will walk you through proper diagnosis, intake manifold removal and replacement, thermostat service, and a thorough cooling system flush that will put this repair to bed the right way.
Understanding the Root Cause: The Intake Manifold Coolant Crossover
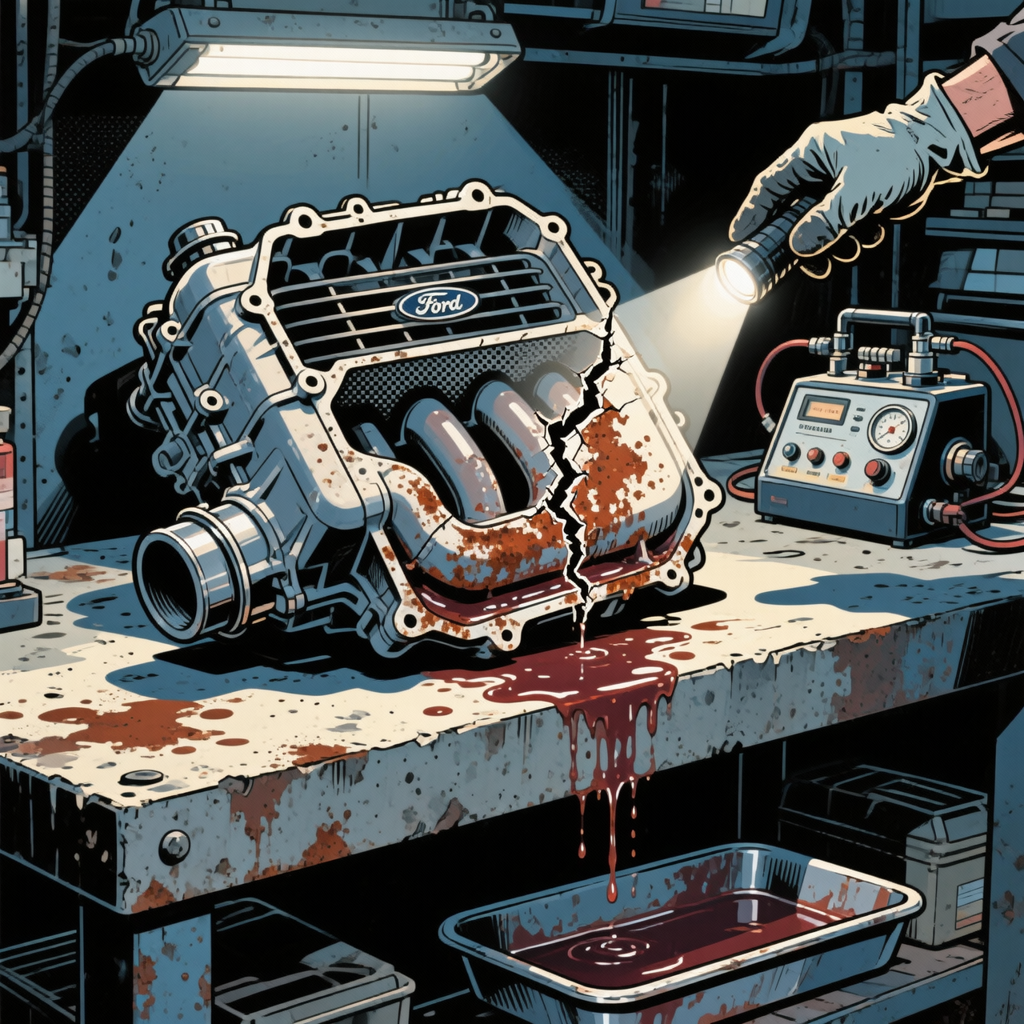
Ford’s 2-valve Triton engines — used in everything from the F-150 and Expedition to the Crown Victoria and Mustang GT — use a composite plastic intake manifold that incorporates internal coolant passages. These passages route coolant through a crossover section of the manifold, and over time the plastic degrades, cracks, or the sealing surfaces around the O-ring seats deteriorate. When they fail, coolant weeps out from the manifold and migrates toward the front of the engine, pooling near the thermostat housing. This fools a lot of techs into condemning the thermostat gasket first.
The telltale signs of a crossover failure versus a simple thermostat gasket leak include: coolant residue spread across a wide area of the intake rather than a tight bead at the thermostat housing, rust-stained coolant indicating extended degradation, and a leak that persists after thermostat gasket replacement. If the coolant has turned brown or orange and has visible particulate contamination, you’re also likely dealing with an electrolysis or stop-leak history — both of which accelerate manifold and gasket destruction. Do not attempt to repair a cracked crossover passage with epoxy or stop-leak products as a long-term fix; replacement is the only reliable solution.
Diagnosis Before You Disassemble
Before pulling the intake manifold, take a few minutes to confirm the failure point. A thorough diagnosis saves time and prevents unnecessary parts replacement.
Step 1 — Cold inspection: With the engine cold and coolant pressure released, inspect the intake manifold surface, thermostat housing neck, and upper radiator hose connection. Use a flashlight to look for dried coolant trails, staining, or crusty deposits. On a 4.6L or 5.4L, coolant originating from the crossover will typically track downward along the front face of the intake.
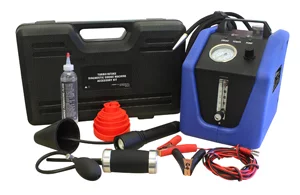
Step 2 — Pressure test the system: Connect a cooling system pressure tester to the radiator or coolant reservoir cap neck and pressurize to 15–18 psi. Hold pressure for 10 minutes and watch for any drop. While the system is pressurized, inspect the intake manifold seam lines, thermostat housing, and hose connections. A slow weep from the manifold body or its sealing surface confirms the diagnosis.
Step 3 — Check coolant condition: Pull a sample of coolant and note its color and clarity. Healthy coolant is bright green, orange (OAT), or yellow depending on the fluid used. Brown, rust-colored, or particulate-laden coolant indicates long-term contamination and means a full flush will be required regardless of what else you find. Note any evidence of stop-leak products — the stringy or flaky residue will complicate your flush procedure.
Step 4 — Confirm no head gasket involvement: Check the oil for milky contamination and look for exhaust gas bubbles in the coolant reservoir with the engine running. A combustion leak test (block test) using chemical tester fluid is a smart precaution before committing to an intake-only repair, especially on higher-mileage engines.


Parts and Tools You’ll Need
Gather everything before you start. The intake manifold job is not difficult, but it does require pulling fuel rails and upper engine components — having the right parts on hand avoids a mid-job hardware store run.
- Replacement intake manifold assembly (OEM-style composite or upgraded units available; verify fitment for 2V vs 4V applications)
- Motorcraft thermostat (part-specific for your application — use OEM spec; aftermarket thermostats are a documented cause of overheating on these engines)
- Thermostat housing gasket or O-ring
- Intake manifold gaskets (upper and lower, as applicable)
- Ford-spec coolant (VC-7-A yellow or the correct OAT/HOAT for your model year) — do not mix types
- Distilled water for mixing and flushing
- Cooling system flush chemical if coolant is heavily contaminated
- Torque wrench (intake manifold bolts require specific torque sequences)
- Fuel line disconnect tools
- Coolant pressure tester
- Drain pan, funnel, and refractometer for coolant concentration check
Intake Manifold Removal and Replacement Procedure
Always work on a cold engine. Drain the cooling system first by opening the petcock at the bottom of the radiator or disconnecting the lower radiator hose — capture all coolant for proper disposal.
Step 1 — Remove the air intake assembly from the throttle body. On most applications this is a straightforward clamp-and-disconnect job. Label or photograph all vacuum lines before removal.
Step 2 — Relieve fuel system pressure by pulling the fuel pump fuse and cranking the engine until it stalls. With pressure relieved, disconnect the fuel supply line from the fuel rail using the appropriate line disconnect tool.
Step 3 — Disconnect the fuel injector connectors and remove the fuel rail assembly. Set it aside carefully — do not stress the injector O-rings.
Step 4 — Remove all coolant hoses attached to the intake manifold, including the crossover hoses and any heater core supply lines routed through the manifold.
Step 5 — Disconnect the throttle body linkage, idle air control valve, and any electrical connectors on the manifold (TPS, IAC, MAP sensor depending on year).
Step 6 — Remove intake manifold bolts in reverse of the tightening sequence (work from outside in). On the 4.6L and 5.4L 2V, there are typically 8 bolts in a specific torque pattern — consult the factory service manual for the correct sequence.
Step 7 — Lift the manifold straight up to avoid dragging the gaskets. Inspect the valley and lifter area for sludge or coolant contamination. If coolant has entered the crankcase, address that before reassembly.
Step 8 — Clean all mating surfaces on the heads and block with a plastic scraper and contact cleaner. Do not use a metal scraper on aluminum surfaces.
Step 9 — Install the new manifold with fresh gaskets. Torque bolts in the correct sequence — typically starting from the center and working outward — to factory spec (commonly 15–18 ft-lbs for these applications; verify for your specific engine). A torque wrench is non-negotiable here; over-torquing cracks the new manifold.
Step 10 — Replace the thermostat and housing gasket while the intake is out and access is clean. Install the Motorcraft thermostat only — this is not a place to substitute a generic part. Torque the housing bolts evenly.
Step 11 — Reinstall fuel rail, injectors, and all vacuum and electrical connections. Double-check every connection against your photos before buttoning up.
Cooling System Flush and Refill
Given the rust and contamination typical in these failures, a proper multi-stage flush is essential. Simply draining and refilling is not sufficient if the old coolant was degraded.
Stage 1 — Chemical flush: If the coolant was heavily contaminated or stop-leak was used, fill the system with a cooling system flush product diluted per the manufacturer’s instructions. Run the engine to operating temperature with the heater on full, then drain completely.
Stage 2 — Distilled water rinse: Fill the system with distilled water only and run the engine again to operating temperature. Drain. Repeat this step a second time if the drain water still shows significant color or particulate.
Stage 3 — Final fill with correct coolant: Mix Ford-spec coolant with distilled water to a 50/50 ratio (or per the OEM specification for your climate). Fill slowly to purge air pockets. On these engines, burping the system is critical — open the bleeder screw if equipped, or leave the upper radiator hose slightly loose at the housing end until coolant flows out without bubbles. Failure to bleed the system properly causes hot spots and repeat overheating complaints.
Stage 4 — Verify with a refractometer: Check freeze protection with a refractometer to confirm your 50/50 mix is correct. Adjust concentration as needed.
Stage 5 — Pressure test and road test: Pressure test the system to 15 psi one final time before delivering the vehicle. Run a full road test to operating temperature, check for leaks, and recheck the coolant level after the engine cools.


Frequently Asked Questions
- Can I just replace the thermostat gasket and skip the intake manifold?
- If your pressure test and visual inspection confirm the leak is isolated to the thermostat housing gasket, yes — replace the gasket and thermostat. However, on the 4.6L and 5.4L 2V Triton, the intake manifold crossover is the cause in the large majority of cases. Replacing only the thermostat gasket when the manifold is cracked will result in a repeat repair within months.
- Why does it have to be a Motorcraft thermostat?
- Ford’s modular V8 cooling system is calibrated tightly around the OEM thermostat’s opening temperature and flow characteristics. Aftermarket thermostats — even those with the correct temperature rating on the box — have documented issues causing erratic temperature control and overheating on these engines. This is one application where OEM is not optional.
- The coolant looks brown and rusty. Does that mean I need more than just an intake manifold?
- Not necessarily, but it does mean the cooling system has been neglected or contaminated with stop-leak products. A thorough multi-stage flush is mandatory. You should also inspect the radiator for flow restriction and the water pump for bearing wear or impeller erosion. If electrolysis has been occurring (indicated by pitting on metal coolant components), trace and eliminate the electrical ground paths contributing to it.
- Can I repair a cracked intake manifold crossover with JB Weld or epoxy?
- Some technicians have reported short-term success with two-part epoxy on external cracks, but this is not a recommended professional repair. The manifold is subject to constant thermal cycling, vibration, and coolant pressure. Epoxy repairs fail unpredictably and can leave you with a worse leak than you started with. Replacement manifolds are affordable enough that it is not worth the risk on a customer vehicle.
- How long does this repair take?
- For an experienced technician, intake removal and replacement on a 4.6L or 5.4L Triton typically runs 3–5 hours including the cooling system flush. First-timers should budget 6–8 hours. The job is straightforward but involves a large number of connectors, vacuum lines, and fuel system components that require careful documentation and reassembly.
- How often should the cooling system be serviced after this repair?
- With fresh OEM-spec coolant installed, a standard service interval is every 2 years or 30,000 miles, whichever comes first. Given the history of these engines with coolant degradation, erring on the side of more frequent changes is reasonable. Always use distilled water for mixing — tap water introduces minerals that accelerate corrosion and electrolysis.
Automotive Cooling System Tools
Proper diagnosis and repair of a coolant leak requires the right equipment. Our Automotive Cooling System category stocks everything you need for pressure testing, flushing, and refilling.
- Cooling system pressure testers for accurate leak diagnosis
- Specialized flush chemicals and refractometers for contamination assessment
- Drain pans, funnels, and hose disconnect tools for safe system service
The Toolsource Technical Team blends decades of real-world automotive service experience with up-to-date technical research. Our writers collaborate with professional mechanics, shop owners, and diagnostic specialists to deliver practical, workshop-ready guidance you can trust.


Follow us on social media