
Visible vapor at the tailpipe can be completely normal in cold weather—or the first sign of coolant intrusion, overheating, or oil burning. This guide gives technicians a structured approach to separate harmless condensation from actionable faults, then verify root cause with the right tests and tools.
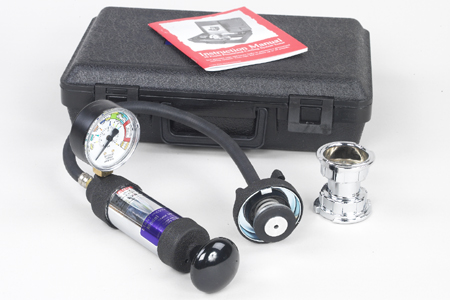


Engine Cooling System Tester Adapter Ford, Land Rover, Mazda
Mfg: Motorad / Stant
Part #: 12043
Know What You’re Seeing: Steam vs. Smoke
Start by identifying the character of the exhaust and operating context. It prevents wasted time and parts.
- Normal steam (condensation): Common on cold starts, especially in cool, humid weather. Appears white, wispy, dissipates quickly, often with water drips at the tailpipe. Usually fades as the exhaust system heats up.
- Coolant vapor: White exhaust that lingers and doesn’t dissipate quickly, often paired with a sweet odor (ethylene glycol) and unexplained coolant loss. May persist even when fully warm.
- Oil smoke: Blue/gray tint, oily smell, may hang in the air. Often shows up after idle-to-throttle transitions or on decel (valve seals) or sustained boost (turbo seals).
- Rich fuel (soot): Black or dark gray smoke with fuel odor, often under load or during cold enrichment. Check trims and O2 sensor data.
Note that high humidity, short trips, and cold exhaust systems can produce visible steam for longer than expected. The key is persistence after full warm-up and corroborating symptoms.
Quick Triage: Observe, Smell, and Verify Basics
Before connecting tools, gather observations. Five minutes here can aim diagnostics in the right direction.
- Ambient and warm-up: Record temperature and humidity. Is the vehicle at cold start, partial warm-up, or fully hot? Harmless steam often disappears as the exhaust heats.
- Smell test: Carefully waft exhaust. Coolant has a sweet odor; oil smells acrid/oily; raw fuel is unmistakable. If unsure, compare to a known-good vehicle in similar conditions.
- Tailpipe moisture: Water condensation dripping from the tailpipe is common on cold starts. Persistent drips with sweet smell deserve further checks.
- Coolant level and condition: With the engine cold, check the expansion tank and radiator (if accessible). Look for low level, oily film, sludge, or rust. Verify cap rating and condition.
- Overheating evidence: Confirm temp gauge behavior, DTCs, or boil-over history. Overheating can create steam from underhood hotspots and accelerate head gasket failure.
- OBD-II scan: Pull codes and live data. Look for misfires (P030x), coolant temp sensor plausibility, fuel trims, thermostat monitoring codes, and catalytic efficiency codes that can be secondary to coolant burning.
Cooling System Diagnostics: Find External and System-Level Faults First
Before condemning a head gasket, validate the integrity of the cooling system. External leaks and weak caps can mimic internal failures.
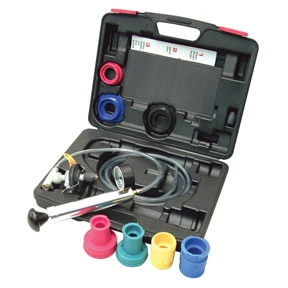
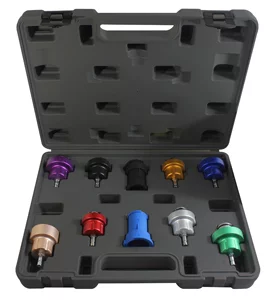
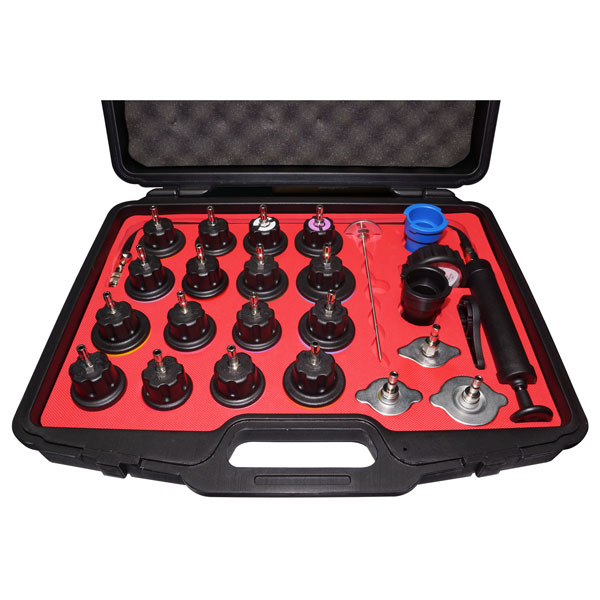
- Pressure test the cooling system: Use a cooling system pressure tester to pressurize to cap rating (cold engine). Hold pressure for 2–5 minutes. Inspect radiator, hoses, heater core connections, water pump weep hole, thermostat housing, and plastic tees. Any drip or odor identifies an external leak. No external drop? Continue.
- Radiator cap test: Test cap cracking pressure and hold using a cap adapter. A weak cap lowers boiling point and can vent coolant, causing loss without obvious leaks.
- UV dye and black light: If the pressure test is inconclusive, add coolant-compatible UV dye, drive to operating temp, and reinspect under UV. Check the radiator, seams, overflow tube, heater core drain/footwell, and crossover pipes. Dye often reveals micro-leaks.
- Cooling fan and airflow: Verify fan operation (command with scan tool if possible), shroud integrity, condenser/radiator fin cleanliness, and debris between cores. Poor airflow can cause steam from the grille area after shutdown or washdowns.
- Thermostat and flow: Monitor ECT with a scan tool and confirm thermostat opening with an infrared thermometer across the thermostat housing and upper/lower radiator tanks. A stuck-shut thermostat or blocked radiator elevates temps and can create underhood steam.
- Coolant quality and mix: Use a refractometer to verify freeze/boil protection. Incorrect mix or contaminated coolant can overheat, cavitate the pump, and mimic head gasket symptoms.
- Bleeding and air pockets: After any service, bleed per OEM procedure or use a vacuum fill tool. Trapped air can cause intermittent overheating, no-heat complaints, and steam plumes.
Confirm or Rule Out Internal Coolant Intrusion
Once external leaks are eliminated, test for combustion-to-coolant crossover or coolant entering cylinders.
- Block test (combustion leak tester): With the engine at operating temp, sample vapor from the radiator neck or expansion tank (as applicable) using a CO₂-sensitive test fluid. A color change indicates combustion gases in the cooling system, supporting head gasket, cracked head, or block issues.
- Cold-soak pressure test and borescope: Pressurize the cooling system on a cold engine and remove spark plugs. Inspect cylinders with a borescope for coolant droplets or clean “steam-washed” pistons. Rotate the engine slowly to examine full sweep.
- Overnight plug check: After an overnight sit, crank with coils disabled. A noticeable stumble and mist from a specific cylinder, or a cylinder filled with coolant, points to a breach near that cylinder.
- Compression and leak-down: Compare cylinder compression. Follow with a leak-down test; listen for bubbles in the radiator neck during each cylinder’s test (cap removed). Bubbles correlate that cylinder with the cooling circuit.
- Cooling system pressurization during run: Observe rapid pressure rise in the cooling system when revving from idle on a cold start (using a pressure transducer or gauge). A quick spike suggests combustion pressurizing coolant passages.
- Oil and coolant cross-contamination: Check oil for milkiness and coolant for oil film. Note that some head gasket failures pass only gas and steam with no visible cross-mix; rely on testing rather than appearance alone.
If confirmed, plan repair scope: gasket, head resurfacing and crack check (magnaflux/dye penetrant), head bolts or studs per OEM torque/angle specs, and thorough cooling-system service (flush, new thermostat, cap, and any degraded hoses).
Overheating and Heat Management: Prevent Recurrence
Many steam complaints start with marginal cooling performance. Correct heat management issues to stabilize the system.
- Thermostat and housing: Replace suspect thermostats with OEM-spec units. Inspect composite housings for warpage/cracks.
- Water pump health: Check for shaft play, leaks, and impeller condition (some aftermarket plastic impellers erode). Flow issues can masquerade as head gasket symptoms.
- Radiator core efficiency: Non-uniform temperature drop across tanks indicates clogging. Use IR mapping in a grid pattern. Replace if multiple cold spots persist.
- Fan command and current draw: Verify fan speeds with scan tool bi-directional controls. Check relays, fuses, resistors, and current draw. Variable-speed brushless fans require correct PID commands and feedback.
- Heater circuit as a diagnostic aid: Loss of cabin heat under load often indicates low coolant or flow restriction. Restored heat after bleeding suggests air pockets were present.
- System fill and bleed: Use a vacuum fill tool to eliminate air. Top off the expansion tank after heat-soak cycles. Road-test, recheck, and document stable levels.
Special Cases and Real-World Nuance
- Cold, short-trip use: Vehicles that rarely reach full temperature build condensation in the exhaust and crankcase, leading to persistent steam on each restart. Encourage longer heat cycles, verify PCV function, and consider oil analysis if moisture is excessive.
- Turbocharged engines: White smoke under boost can be coolant or oil via turbo seals or CHRA. Inspect intercooler for pooled fluid, check shaft play, and pressure-test charge air system. A sweet odor plus coolant loss suggests coolant-cooled CHRA leakage on some designs.
- After washdowns/rain: Visible steam from the grille or heat shields can be normal as water evaporates on hot exhaust components. Confirm no coolant drop and no sweet odor before condemning parts.
- Air-cooled/small engines: Water contacting hot fins or exhaust will steam until dry. No coolant system exists, so chase oil smoke only if blue/gray and oily.
- Fuel-rich conditions: High black smoke indicates AFR issues—check CTS plausibility, MAF contamination, fuel pressure regulators, and stuck injectors before assuming coolant problems.
Field Checklist: What to Capture Before You Grab Tools
- Ambient temp/humidity and whether the symptom occurs only cold, only hot, or always
- Exhaust appearance (white wispy, white lingering, blue/gray, black) and odor (sweet, oily, fuel)
- Coolant level trend and presence/absence of external leaks
- ECT behavior, fan operation, and any overheating history
- DTCs and misfire data (cylinder-specific)
- Tailpipe moisture vs. abnormal residue
- Customer drive pattern (short trips vs. sustained highway)
Recommended Tools and Supplies
- Cooling system pressure tester with vehicle-specific adapters
- Radiator cap tester
- Combustion leak (block) tester and CO₂-reactive fluid
- OBD-II scan tool with live data and bi-directional fan control
- Infrared thermometer or thermal imager
- UV dye and leak detection lamp/glasses
- Vacuum coolant fill/bleed kit
- Borescope, compression gauge, and leak-down tester
- Coolant refractometer and spill-free funnel
FAQs
How long is white exhaust “steam” normal on a cold day?
It varies with humidity and temperature. Wispy white vapor that dissipates quickly can persist several minutes until the exhaust system and catalyst are hot. It should diminish substantially after full warm-up. Lingering, dense white exhaust with a sweet odor after warm-up warrants coolant-intrusion tests.
Can I drive if I suspect a mild head gasket leak?
It’s risky. Combustion gases can overpressurize the cooling system, causing overheating and secondary damage. Coolant entering a cylinder can foul plugs, damage the catalyst, and—if severe—hydrolock the engine. Confirm with a block test and plan repair before extended driving.
What does coolant smell like in the exhaust?
Ethylene glycol-based coolant has a distinctive sweet odor. If the odor is present with white exhaust that lingers and you’re losing coolant, perform a block test and pressure test. Some vehicles use less-sweet propylene glycol; rely on multiple indicators, not smell alone.
Why does the front of the vehicle “steam” after washing or driving in rain?
Water contacting hot exhaust manifolds, catalytic converters, or heat shields will vaporize and produce visible steam. This can be normal immediately after exposure. Confirm the coolant level is stable, ensure no sweet odor, and check for leaks if steam persists beyond dry-out.
Could a bad thermostat or radiator cap cause white exhaust?
Indirectly. A stuck thermostat or weak cap can cause overheating or boiling, which may vent coolant and create underhood steam. While they don’t create tailpipe steam directly, the resulting thermal stress can accelerate head gasket failure that does produce white exhaust.
What’s the fastest way to rule out internal coolant leaks?
Do a cooling system pressure test to rule out externals, then perform a block test at full operating temperature. If the block test is positive, corroborate with a cold pressure test plus borescope inspection and a cylinder-specific leak-down test listening for bubbles in the radiator.
With a structured approach and the right tools, you’ll separate harmless cold-weather vapor from genuine faults, verify root cause, and prevent comebacks.
Shop Cooling System Tools
For the tests in this guide, explore Cooling System Tools for pressure testing, vacuum filling, and leak detection essentials here.
- Cooling system pressure testers, cap testers, and adapters
- Vacuum fill/bleed kits to eliminate air pockets after service
- UV dye kits, leak detection lamps, and coolant refractometers
The Toolsource Technical Team blends decades of real-world automotive service experience with up-to-date technical research. Our writers collaborate with professional mechanics, shop owners, and diagnostic specialists to deliver practical, workshop-ready guidance you can trust.


Follow us on social media