
If your windows fog up the moment the weather turns cool or wet, you’re dealing with two problems: too much moisture inside the cabin and HVAC settings that aren’t evacuating it. This guide gives you a quick defog procedure, then walks you through the inspections most techs use to track down trapped water, clogged drains, and HVAC issues that keep glass foggy. Everything here is practical, tool-forward, and applicable to both older and modern vehicles.

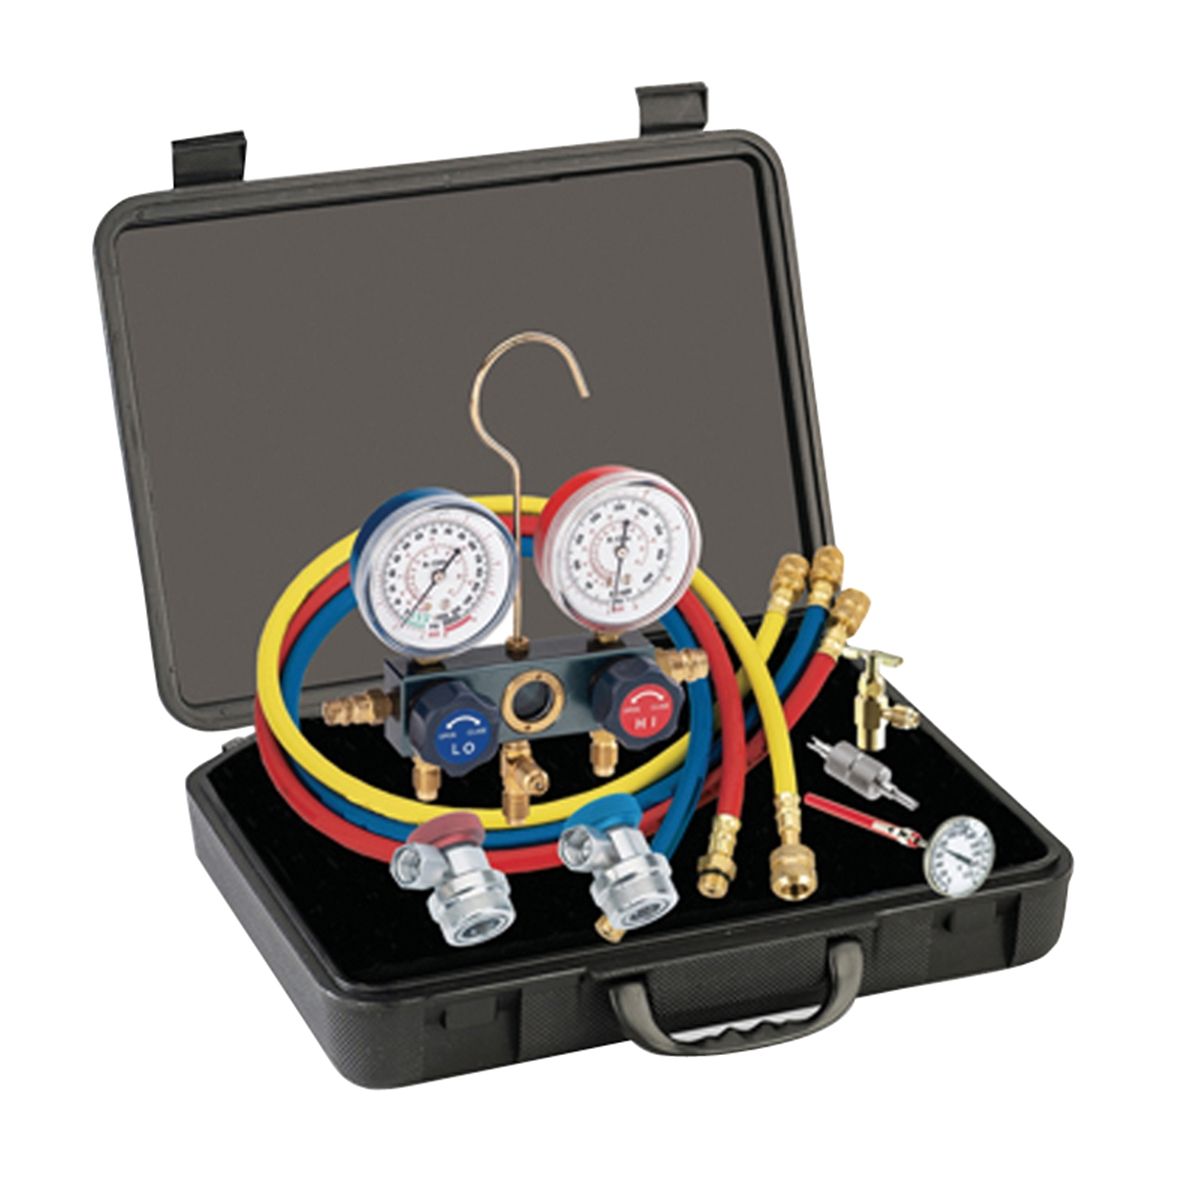



R134a Four-Way Manifold Gauge Set w/ 72 In Hoses - 90 Degree Cou
Mfg: Mastercool
Part #: 87772G
Immediate Defog Procedure (Works in Most Conditions)
Clear the glass first so you can drive safely, then diagnose the source.
- Turn off recirculation. Use outside air. Recirc traps moisture from occupants and wet carpets.
- Select defrost/defog mode so airflow is directed to the windshield (and often side glass). Engage rear defogger.
- Turn A/C on. A functioning A/C dehumidifies the air even with heat commanded. If ambient is near freezing, the compressor may be inhibited, but enable it anyway when possible.
- Temperature: warm to hot. Warm air holds more moisture, speeding evaporation off glass and surfaces.
- Fan: high. Move as much air across the glass and through the cabin as possible.
- Crack a window 1–2 cm. This provides an exhaust path for wet interior air, especially if the A/C is limited by cold ambient temperatures.
With the above, the windshield should begin clearing within seconds; other glass typically follows within a couple of minutes. If defog performance is weak even with correct settings, proceed to the HVAC checks below.
HVAC Checks That Affect Fogging
Before hunting for leaks, make sure the system can actually dry the air and direct it where it counts.
- A/C compressor operation: With A/C commanded and engine running, verify compressor clutch engagement or variable displacement control activity. Expect cold low-side line at the firewall and heat rejection at the condenser. If the A/C doesn’t operate above freezing ambient, diagnose the A/C before expecting strong dehumidification.
- Mode door function: Verify the mode selector fully routes airflow to defrost. A sticky or broken door actuator can leave airflow stuck at panel/floor, barely touching the glass.
- Blend door function: If full hot or full cold never occurs, you won’t get optimal drying. Confirm temperature door movement.
- Cabin air filter: Inspect behind the glovebox. A clogged filter chokes airflow and encourages moldy odor. Replace annually or per service interval. Check for rodent nesting on top of the filter if airflow is severely restricted.
- Evaporator drain: After A/C use, you should see water dripping under the vehicle (passenger side on most). No drip and a damp passenger footwell suggests a clogged drain. Clear the drain with a flexible nylon line or soft brush from the outlet grommet—avoid metal picks that can pierce the case. Do not blow high-pressure air into the case from inside; you can dislodge the drain tube.
- Recirculation door: Confirm the recirc door opens for fresh air when commanded off. Some older vehicles and some settings keep recirc on by default. If defrost doesn’t automatically cancel recirc, switch it manually.
Find and Fix Moisture Intrusion (Most Common Root Cause)
Interior fog is almost always worse when water is pooling in the vehicle. Systematically check these hotspots:
1) Carpets and underlayment
- Footwells: Press firmly for squish. Lift edge of carpet and check the foam underlay; it can hold liters of water without obvious surface dampness.
- Under seats and center tunnel: Moisture migrates; inspect both front and rear zones.
- Drying tip: Use a wet/dry vacuum to extract water, then fans and heat to drive off remaining moisture. Desiccant tubs help once bulk water is removed.
2) Trunk/spare tire well
- Lift the trunk floor and inspect the spare tire well. If you see standing water, you’ve found a humidity generator.
- Common sources: Tail lamp gaskets, trunk lid seal, body seam sealer failures, rear vent flaps, and clogged trunk gutter drains.
- Drain and dry: Mop or vacuum out water, remove rubber drain plugs temporarily to purge, and dry with fans. Replace compromised gaskets and re-seal seams as needed.
3) Door interiors and drains
- Doors are designed to shed water past the window sweep and out the bottom drain holes. Clogged drains or failed vapor barriers allow water onto the door panel and carpets.
- Open the doors and inspect the drain slots along the bottom. Clear debris with a plastic trim tool or cable tie. Ensure you see water drain through during a hose test.
- If carpets are wet below a specific door, remove the door panel and re-seal the vapor barrier with butyl tape.
4) Cowl intake and plenum drains
- The HVAC fresh-air intake sits at the base of the windshield. Leaves and debris can block the plenum, allowing water to overflow into the blower housing and passenger footwell.
- Remove cowl trim as needed. Vacuum out debris, verify drain paths are open, and ensure the cabin air filter cover and seals are intact.
5) Sunroof drains (if equipped)
- Sunroofs channel water into drain tubes that exit at the A-pillars or rocker panels. Clogs push water into headliners and down pillars into carpets.
- Test by gently pouring a small amount of water into each corner of the sunroof tray; look for timely discharge under the car.
- Clear drains with soft weed-trimmer line from the top down. Avoid compressed air; you can blow hoses off their fittings inside pillars.
6) Heater core leak
- Symptoms: Sweet coolant odor, oily film on interior glass, fog that worsens with heat on, unexplained coolant loss, damp passenger footwell without outside rain.
- Inspection: Check coolant level stability, look for residue at the HVAC case weep holes, and use UV coolant dye if needed.
- Fix: Replace the heater core and flush the HVAC box. Do not rely on stop-leak; it can compromise small passages and heater performance.
Drying Techniques That Actually Work
Once leaks are corrected or while you’re tracing them, remove the moisture load so the HVAC can keep up.
- Extract bulk water: Wet/dry vacuum the carpets, underlay, and trunk wells. Remove floor mats and hang to dry.
- Lift carpet edges: Use trim tools to lift thresholds and gently prop carpets up with clean blocks for airflow.
- Air movement and heat: Position a fan or two inside the cabin with doors cracked. If in a garage, a space heater can help—but observe safe heater practices and ventilation.
- Desiccants: Place multiple automotive moisture absorbers (silica or calcium chloride) overnight. Replace or recharge as indicated.
- Run HVAC to assist: With engine at operating temperature, run A/C on with heat and defrost selected, recirc off, for 15–30 minutes. In cold climates where A/C is locked out, run heat on defrost with a window cracked to vent moist air.
- Repeat until underlay is fully dry: Use a moisture meter if available. Foam underlay can take days to fully dry; don’t rush reassembly.
Clean Interior Glass to Reduce Re‑Fogging
Residue on glass (from smoking, vaping, off-gassing plastics, or cleaners with surfactants) accelerates fogging by providing nucleation sites. Deep-clean the inside of the glass:
- Degrease first: Wipe with a 70% isopropyl alcohol solution on a clean microfiber to strip films.
- Glass cleaner: Follow with an automotive glass cleaner that is tint-safe and ammonia-free.
- Stubborn film: Use a dedicated glass polish or glass-specific clay pad if hazing persists.
- Optional anti-fog: Apply a quality anti-fog treatment to interior glass. Follow directions closely—over-application causes smearing. Avoid anti-fog on aftermarket window tint unless labeled safe.
Replace contaminated microfibers frequently during cleaning. Any residue left behind will invite fogging.
Preventive Practices
- Use recirc sparingly: Only for brief periods in heavy traffic, strong odors, or extreme heat. Turn it off for normal driving.
- Defrost discipline: In cold or wet weather, begin every drive with defrost + A/C on and outside air until glass is clear.
- Keep the cowl clear: Regularly remove leaves and debris at the base of the windshield.
- Service the cabin filter: Replace yearly or sooner if airflow drops or odors develop.
- Mind the mats: Shake snow and water off footwear and mats. Empty rubber mats frequently.
- Check drains seasonally: Door, sunroof, cowl, and trunk drains should be verified open before wet seasons.
- Exercise the A/C: Run the A/C weekly (weather permitting) to keep seals lubricated and the system dehumidifying efficiently.
Quick Diagnostic Checklist
- Defog settings correct (outside air, defrost, A/C on, warm, fan high, window cracked).
- Cabin filter clean and correctly seated.
- A/C evaporator drains water under car; no damp passenger footwell.
- No standing water in trunk/spare well; trunk seals and tail lamp gaskets intact.
- Door drains open; no wet carpet below doors; vapor barriers sealed.
- Sunroof drains flow; no headliner/pillar dampness.
- No coolant odor or loss; no oily film on glass (heater core ruled out).
- Interior glass thoroughly cleaned; optional anti-fog applied.
FAQs
Why do my windows fog even with the A/C on?
Two reasons: moisture load and temperature. If the cabin has soaked carpets or standing water, the A/C can’t keep up—especially with multiple occupants exhaling moisture. In cold weather, many vehicles limit or disable compressor operation near freezing, so you’re not actually dehumidifying. Use outside air, heat, and a window crack to vent moisture until the interior is truly dry.
Should I ever use recirculation in winter?
Yes, but briefly. Recirc helps in heavy traffic or when blocking odors, and it can speed cooldown/warmup. For defogging, recirc usually makes things worse by trapping humidity. Many vehicles automatically disable recirc when defrost is selected—if yours doesn’t, turn it off manually.
How do I know if my A/C drain is clogged?
Signs include a damp passenger footwell after A/C use, musty odors, and no water dripping beneath the passenger area after a drive with A/C on in humid weather. Inspect the drain outlet under the vehicle and gently clear it with a flexible plastic line. Avoid high-pressure air or metal picks that can damage the HVAC case or dislodge tubing.
Could a heater core be causing the fog?
Yes. Coolant vapor creates a persistent film on glass, a sweet smell, and fogging that often worsens with the heater on. You may also see unexplained coolant loss and dampness near the HVAC case. Confirm with a cooling system pressure test or UV dye. The correct repair is heater core replacement and HVAC box cleanup.
Does cleaning the glass really make a difference?
Absolutely. Film from smoking, vaping, silicone dressings, and plasticizers makes fogging happen faster and stick longer. A two-stage clean (IPA wipe followed by a quality glass cleaner) can noticeably reduce re-fogging. Consider a proven anti-fog product for added margin, especially on vehicles that regularly carry multiple occupants.
What if the windshield clears but the side windows stay foggy?
That’s normal early on because most HVAC airflow targets the windshield. Keep defrost on high and crack a window. If side glass consistently lags, verify your defrost mode includes side vents (many do) and that the cabin isn’t holding excess moisture from leaks or wet mats.
How long will it take to fully dry soaked carpets?
With carpet edges lifted, continuous fan airflow, and some heat, expect 24–72 hours depending on ambient conditions and underlay thickness. Extract as much water as possible with a wet/dry vacuum first; desiccants are helpful after bulk water removal.
Shop HVAC & Leak-Trace Tools
Wrap up with the right gear—see our A/C service and leak-trace selection to diagnose moisture sources and improve defog performance.
- A/C manifold gauges, thermometers, and vacuum pumps for system checks.
- UV dyes, inspection lights, and electronic leak detectors.
- Trim tools, hose picks, and flexible line for clearing evaporator and body drains.

The Toolsource Technical Team blends decades of real-world automotive service experience with up-to-date technical research. Our writers collaborate with professional mechanics, shop owners, and diagnostic specialists to deliver practical, workshop-ready guidance you can trust.


Follow us on social media