Brake pad and rotor replacement is commonly misunderstood by vehicle owners. Thousands of drivers pay inflated repair bills annually because they can’t distinguish legitimate brake wear from unnecessary upselling. Knowing when brakes need replacement can save $1500+ while keeping your vehicle safe. This guide covers everything you need to know to avoid overcharges and perform safe maintenance.
Signs Your Brakes Need Replacement
How to measure brake pad thickness and wear indicators
Replace brake pads when friction material reaches 3-4mm. Most pads have built-in wear indicators—metal tabs that contact the rotor at approximately 2-3mm, creating a high-pitched squeal. Measure pad thickness using a brake pad gauge or digital caliper (measure friction material only, excluding the backing plate). New pads typically range 10-12mm. Less than 4mm requires replacement; 2mm or less means immediate danger with significant performance deterioration and likely rotor damage.
Identifying metal-to-metal contact and rotor damage
Metal-to-metal contact occurs when pads wear completely through, causing the steel backing plate to grind against the rotor. This creates deep grooves, distinctive grinding noise, and vibration. Once this happens, rotor replacement is mandatory—these rotors cannot be safely resurfaced. Check rotor thickness with a micrometer at multiple points and compare against the minimum thickness specification stamped on the rotor. Most rotors can be resurfaced once or twice only if they remain above minimum thickness and show no cracks, excessive heat checking, or deep scoring.
Common symptoms signaling brake problems
Pulsation during braking indicates warped rotors or uneven pad deposits. Pulling to one side suggests uneven pad wear, seized caliper pins, or brake fluid contamination. Spongy pedal feel indicates air in brake lines or worn fluid. A slowly sinking pedal points to master cylinder failure or external leaks. Low brake warning light often means worn pads pushed pistons out further, dropping reservoir levels. Per the National Highway Traffic Safety Administration, brake system problems contribute to thousands of accidents annually, making maintenance critical.
DIY vs Professional: Cost Breakdown
Real pricing comparison
| Service Provider | Front Axle Cost | Parts Quality | Warranty |
|---|---|---|---|
| Dealership | $400-$700 | OEM or premium | 12-24 months |
| Independent Shop | $250-$450 | Aftermarket varies | 12 months |
| Chain Store | $200-$400 | Economy to mid-grade | Limited lifetime |
| DIY | $100-$250 (parts) | Your choice | Your responsibility |
Prices cover one axle. Rear brakes cost 10-20% less. DIY saves $150-450 per axle but requires proper tools, workspace, and skill. One mistake can erase savings.
Essential tools for DIY brake work
Minimum requirements: floor jack (rated for your vehicle), jack stands (never work under a jack-only vehicle), lug wrench, brake caliper tool or C-clamp, torque wrench, brake cleaner, wire brush, and high-temperature brake grease. For bleeding: vacuum pump kit, clear tubing, and catch bottle. Electronic parking brake systems require scan tools. A complete tool kit costs $200-400; you need 2-3 jobs to break even against shop labor.
Safety critical requirements
Never work under a vehicle supported only by a jack—always use rated jack stands on solid frame points. Work on level, solid ground only. Keep brake fluid away from painted surfaces (it strips paint instantly). Never reuse old brake fluid. Wear safety glasses when compressing pistons. Avoid breathing brake dust; use brake cleaner instead of compressed air. ChrisFix on YouTube provides excellent safety-focused DIY guides.
Step-by-Step Brake Replacement
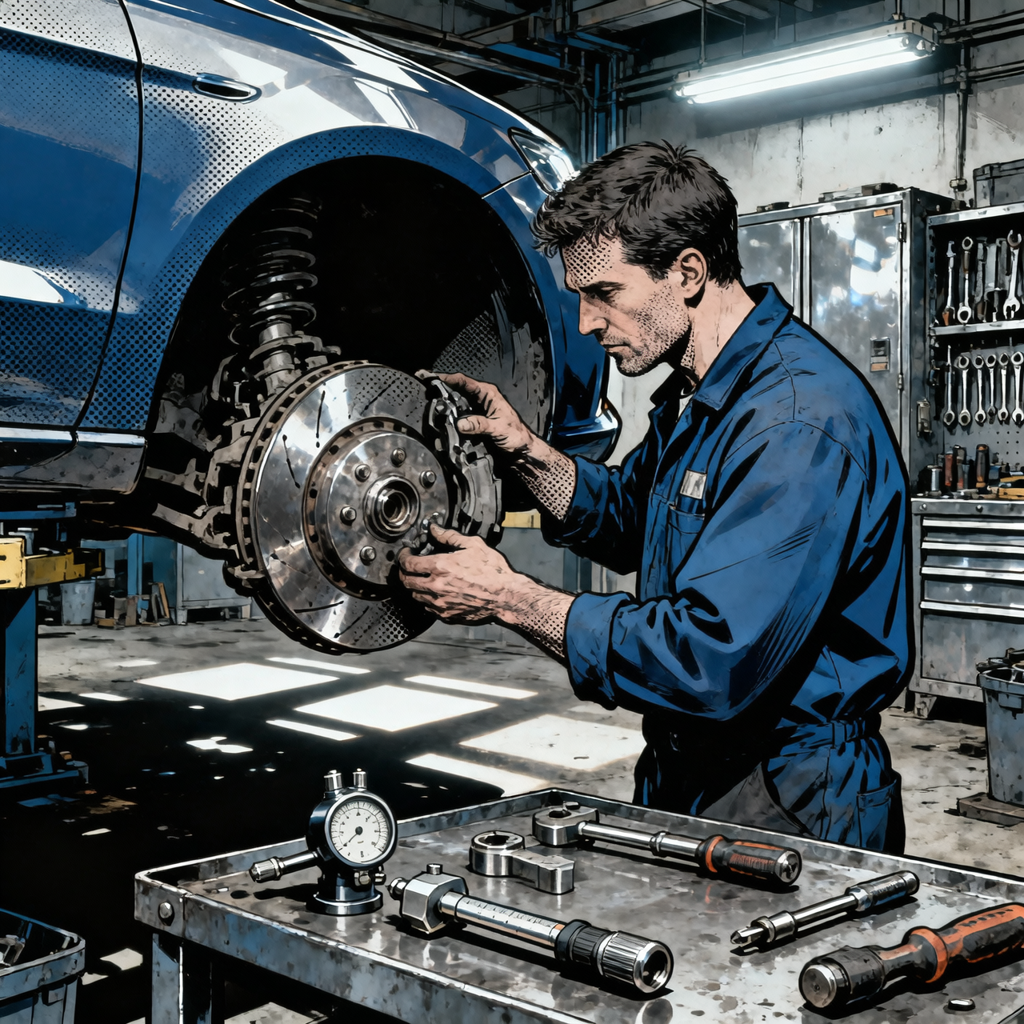
Removing calipers and inspecting rotors
Loosen lug nuts before lifting. Raise vehicle and secure on jack stands. Remove wheels and spray brake cleaner on the assembly. Note pad wear pattern—uneven wear indicates caliper or contamination problems. Remove caliper bolts (14-19mm) and support the caliper with wire (never hang by brake hose). Inspect slide pins for corrosion. Remove caliper bracket bolts (17-21mm) to access rotor. Inspect rotor surfaces for grooves, cracks, or heat checking. Measure rotor thickness at eight points. If measurements exceed minimum specification by 0.5mm with only minor scoring, rotors may be resurfaced. However, modern thin rotors often make replacement more cost-effective than machining.
Bleeding brakes and piston safety
Open the bleeder screw before compressing pistons to drain old fluid and prevent contaminating the ABS system. Keep piston face parallel to bore—angling damages the square-cut seal. For rear calipers with integrated parking brakes, some require rotation while compressing (using a wind-back tool); others need electronic retraction via scan tool. Forcing these destroys the parking brake mechanism. After installation, pump the pedal until it firms up, then bleed starting from the wheel furthest from the master cylinder (right rear), working toward the closest (left front).
Reinstalling with correct torque and bedding
Caliper bracket bolts: 70-90 ft-lbs. Caliper slide bolts: 25-35 ft-lbs with high-temperature grease. Wheel lug nuts: 80-100 ft-lbs (passenger vehicles) in star pattern. Bed new pads by making 8-10 stops from 40-45 mph to 15 mph with moderate pressure, allowing 30-60 seconds between stops. Avoid hard stops or prolonged pedal pressure immediately after installation. Car and Driver’s guide emphasizes proper bedding prevents noise and reduces performance.
Spotting Mechanic Upselling
Do you really need new rotors?
Many shops automatically replace rotors, but it’s not always necessary. Replace only when below minimum thickness, cracked, severely scored, or excessively warped. If rotors measure above minimum with no cracks, scoring, or vibration, they can survive another pad cycle. Modern thin rotors make replacement often cheaper than resurfacing. Ask shops to show micrometer measurements and minimum specification. Avoid shops with blanket policies like “we always replace rotors with pads”—that’s profit-driven, not safety-required.
When calipers need replacement
Replace calipers only for seized pistons, leaking seals, severe corrosion, or binding pins that won’t clean. Avoid shops replacing “old” calipers without visible problems. Rebuilding costs less than replacement but requires proper tools and skill. Loaded remanufactured calipers offer best DIY value. Typical caliper replacement adds $150-300 per axle—wasted money if calipers were functioning.
Red flags: Electronic parking brakes and labor charges
Electronic parking brakes require scan tools, adding 15-30 minutes. Some shops charge $50-100 extra for essentially plugging in a tool and clicking—pure profit. Red flag: quotes exceeding 1-2 hours labor per axle for straightforward pad replacement. Request itemized quotes (parts + labor). Compare parts pricing against RockAuto or local stores. If shop prices exceed retail by 30-40%+, you’re overcharged. Avoid shops claiming every job needs fluid flush, caliper replacement, or other add-ons without showing specific problems.
Brake Maintenance to Avoid Expensive Repairs
Inspection schedule and preventive maintenance
Inspect brake pads every 10,000-12,000 miles or annually. Check fluid level monthly—gradual drops indicate normal wear or leaks (urgent). Lubricate caliper slide pins annually. Inspect brake hoses for cracks every two years. Most vehicles need pad replacement every 30,000-70,000 miles depending on driving style, pad type, and weight. Highway driving wears pads less than city traffic. Catch wear early—before metal-to-metal contact—to preserve rotors and save hundreds.
Brake pad types and value
Organic (NAO) pads: quiet, minimal rotor wear, but shorter life (30,000-50,000 miles). Semi-metallic: better heat dissipation, longer life (50,000-70,000 miles), more noise and rotor wear. Ceramic: best balance—quiet, low dust, minimal rotor wear, 60,000-80,000 miles—costs 30-50% more but best value per mile. Calculate cost per mile, not upfront price.
Brake fluid maintenance
Brake fluid absorbs moisture over time. Water lowers boiling point and causes internal corrosion. Replace every 2-3 years or when moisture exceeds 3% (use inexpensive testers). Never let the reservoir run dry. Use only specified fluid type (DOT 3, DOT 4, or DOT 5.1)—never mix types. Keep containers sealed; once opened, fluid absorbs atmospheric moisture. Pour from freshly opened containers. This simple maintenance prevents thousands in caliper, ABS, and master cylinder failures.
Essential Brake Service Checklist
- Measure pad thickness at all four corners (replace at 3-4mm)
- Inspect rotors for cracks, deep scoring, heat damage
- Measure rotor thickness with micrometer at multiple points
- Check brake fluid level and condition (test moisture)
- Inspect brake hoses for cracks, bulges, or leaks
- Test caliper slide pins for binding or corrosion
- Verify parking brake operation
- Check for uneven pad wear (caliper problems)
- Clean and lubricate caliper hardware with high-temp grease
- Torque all fasteners to specs
- Bleed if pistons compressed with bleeder closed
- Perform proper bedding on new pads
- Test brakes in safe area before normal driving
Frequently Asked Questions
Is $1500 fair for brake pads and rotors?
$1500 for complete four-wheel replacement at a dealership or quality independent shop is reasonable but on the higher end. Includes premium pads, quality rotors, labor, cleaning, hardware, and warranty. Front brakes only: $300-500 (independent) or $400-700 (dealer). Prices exceeding these ranges warrant a second opinion. Always request itemized quotes to identify overcharging.
Can I replace brakes without mechanical experience?
Brake work is safety-critical—complete beginners shouldn’t attempt it as their first repair. Mistakes cause brake failure and serious accidents. With basic experience (oil changes, air filter replacement, tire rotation), front pad replacement on standard calipers is achievable with research and proper tools. Electronic parking brakes, complex calipers, and ABS systems require additional expertise and tools.
What if my brake piston won’t retract?
A stuck piston indicates a seized caliper needing replacement or rebuilding (corrosion, seal deterioration). Never force it excessively—you’ll damage the seal or crack the housing. For integrated parking brake calipers, verify the correct method (some require rotation with a wind-back tool; others need electronic retraction). If the piston still won’t move using correct technique, the caliper has failed and needs replacement.
How long do rotors last?
Quality rotors typically last 2-3 pad sets or 60,000-100,000 miles under normal conditions. Lifespan depends on driving style, rotor quality, pad material, and resurfacing. Aggressive driving, frequent hard stops, or mountain driving reduces life. Modern thin rotors may last 40,000-60,000 miles. Highway-driven vehicles with smooth braking can exceed 100,000 miles if never reaching metal-to-metal contact.
Should I replace pads and rotors together?
Not necessarily. Replace rotors only when below minimum thickness, cracked, severely warped, or deeply scored. Good-condition rotors measuring above minimum specification with smooth surfaces and no vibration can service another pad cycle. However, replacing together makes sense if rotors are near minimum thickness or you’re experiencing vibration issues, since new pads bed better to new rotors and cost difference is often minimal.
What causes rotor warping?
Rotor “warping” usually isn’t actual deformation but uneven pad deposits or thickness variation. True heat warping is rare in modern rotors. Common causes: improper lug nut torque (uneven clamping), keeping feet on brake pedal while stopped (uneven material transfer), washing hot brakes with cold water, or overtorquing caliper bolts. Prevent by using correct torque specs, proper bedding, avoiding prolonged pedal pressure while stationary, and allowing brakes to cool naturally after hard use.
Shop Brake System Products
Now that you know when to replace your brake pads and rotors, it’s time to find quality components for your vehicle. Our Brakes category offers a complete selection of OEM and premium aftermarket parts to keep your stopping power optimal.
Ready to upgrade your braking system? Explore these essentials:
- Brake Pads: Ceramic, semi-metallic, and organic compounds for every driving style
- Rotors & Discs: Slotted, drilled, and solid options with superior heat dissipation
- Brake Hardware Kits: Complete clips, shims, and fasteners for professional installation
The Toolsource Technical Team blends decades of real-world automotive service experience with up-to-date technical research. Our writers collaborate with professional mechanics, shop owners, and diagnostic specialists to deliver practical, workshop-ready guidance you can trust.


Follow us on social media