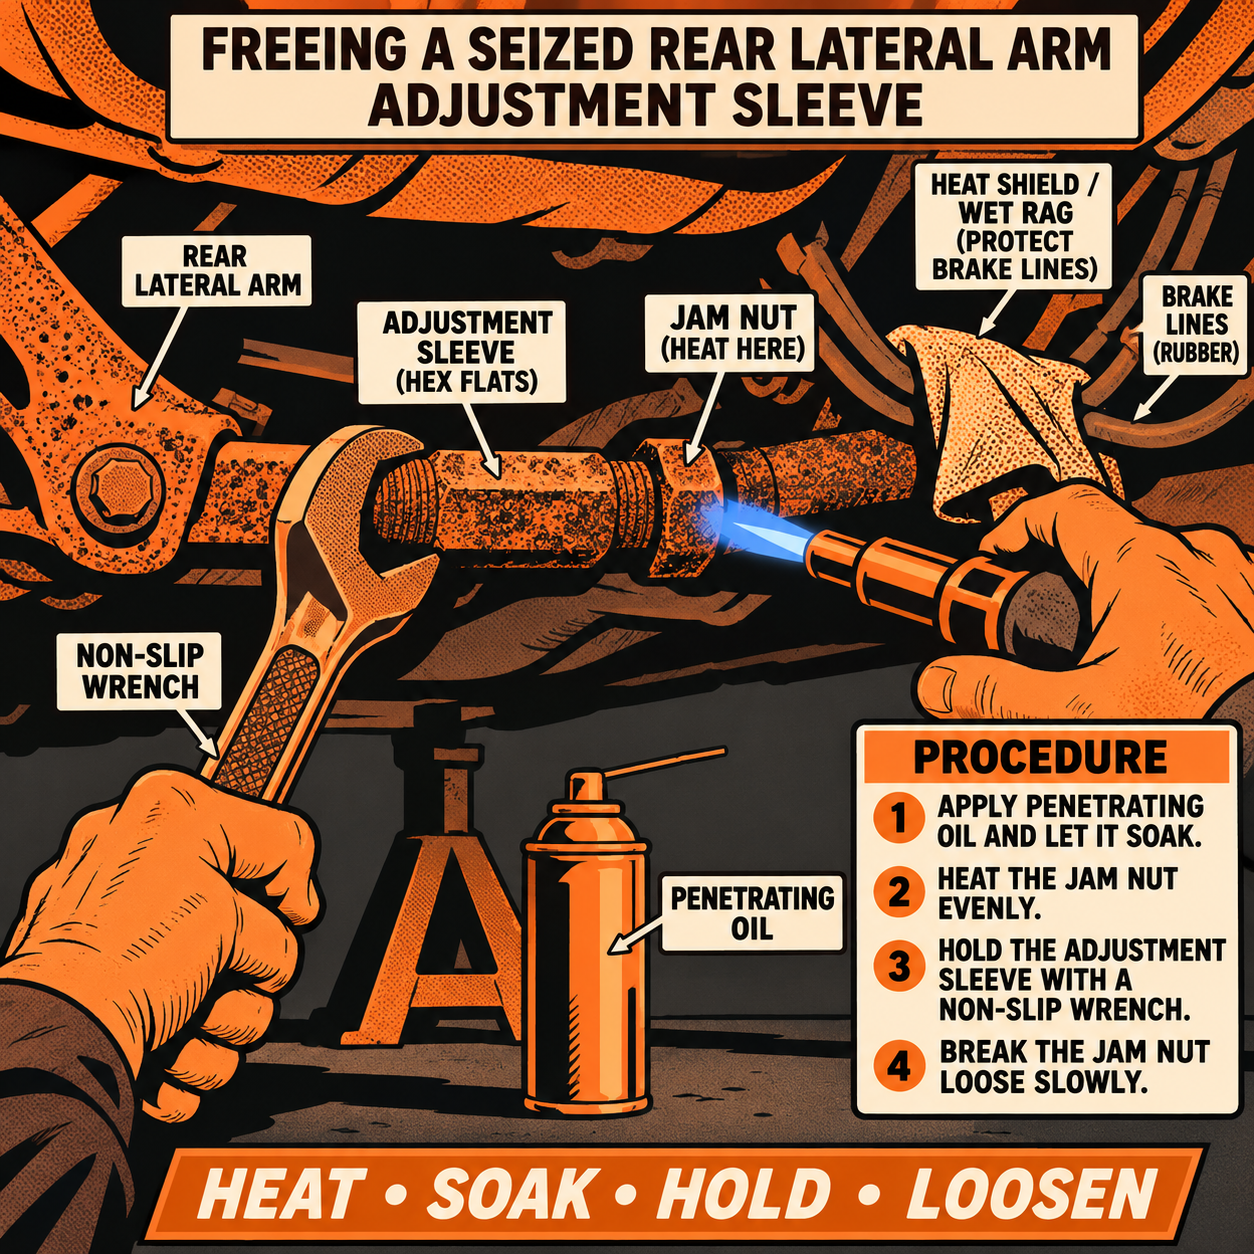
Every alignment tech has stared down a rear lateral arm adjuster coated in surface rust and had to make a call: fight it with heat and penetrant, or quote a replacement and move on. Online debate about this exact scenario usually splits into two camps — “that’s barely rusted, grab a torch” and “that’s exactly what the flat-rate labor time doesn’t cover.” Both are right in different shops. What separates a good outcome from a snapped stud or a customer stuck with an undriveable car is technique, communication, and knowing when the hardware has already told you it’s done. Here’s a practical breakdown for anyone facing a crusty rear toe adjuster on the rack.
Identify the Part Before You Touch It
What most customers describe as “the rusty bolt the alignment guy pointed at” is almost always the rear lower rearward lateral arm, sometimes called the rear toe adjustment arm or rear adjustable lateral control arm. It’s the suspension link with an eccentric or threaded sleeve that lets the tech dial in rear toe on the alignment rack. On most Toyota, Lexus, and similar platforms, it sits low on the rear subframe, running fore-aft, with a jam nut and a visible turnbuckle-style adjustment sleeve.
Confirm it on a lift before quoting anything. Look for:
- A visible adjustment sleeve or turnbuckle with wrench flats on each end
- A jam nut (sometimes two) that must be loosened before the sleeve will turn
- Surface rust versus flaking, pitted corrosion — texture matters more than color
Replacement parts are inexpensive and widely stocked — commonly cited pricing runs $30–$55 for a quality aftermarket arm (Dorman 905807 is a frequently referenced part number for popular applications), so this isn’t a part that justifies destroying in place if it’s already marginal.
Free It the Right Way: Heat, Penetrant, Patience
Experienced alignment techs are consistent on this point: light-to-moderate surface rust on a toe adjuster sleeve is routine, not exceptional, and shouldn’t be treated as a reason to stop. The standard sequence:
- Soak first. Apply a quality penetrating oil (not just WD-40) to the jam nut and sleeve threads. Let it sit — even 10–15 minutes helps more than people expect.
- Apply heat strategically. A short burst from a torch on the jam nut (away from boots, brake lines, and fuel lines) breaks the rust bond quickly. Most seized adjusters free up within 30 seconds of heat.
- Use the right wrench. A non-slip or crow’s foot wrench matched to the flats prevents rounding corroded nuts. Rounded fasteners turn a 15-minute job into a cut-off-wheel job.
- Add leverage, not violence. A cheater bar or pipe extension on a properly seated wrench is fine. Hammering on a ratchet or using vice grips on rounded flats is how sleeves snap.
- Re-torque and re-soak if it doesn’t move immediately. Repeated short heat cycles with fresh penetrant beat one long, overheated attempt that can damage boots or bushings.

MINI DUCTOR II (MD-700) W/COIL KIT (MD99-650)
Mfg: Induction Innovations
Part #: MD-750


Watch for Reverse-Thread Hardware
One detail that trips up newer techs: on many vehicles, one side’s adjustment sleeve uses a left-hand (reverse) thread by design, so the sleeve can be rotated without disconnecting either end. If a “stuck” nut suddenly feels like it’s tightening instead of loosening, stop and check the shop manual or a parts diagram before forcing it further. Misreading thread direction is a common reason techs give up and call a part “frozen” when it’s actually just being turned the wrong way.
Know When to Stop and Quote Replacement
Not every adjuster is a quick heat-and-turn job. Signs that you’re past the point of safely freeing it in place:
- Deep pitting or scaling that’s eaten into the thread profile, not just surface discoloration
- No movement after two heat cycles and fresh penetrant on both ends
- Visible distortion, bending, or a sleeve that’s rusted solid to the end links
- Any crack or stress mark appearing in the sleeve body during the attempt
At that point, the professional move — echoed consistently by techs who do this daily — is to stop before the part fails catastrophically, explain to the customer that the hardware is seized beyond safe adjustment, and quote the replacement arm plus labor before proceeding. Leaving a vehicle on the rack with a snapped adjuster and no warning given upfront is the scenario that turns a routine alignment into a liability problem.
Set Expectations on Labor Time and Pricing
A chunk of the disagreement around “lazy mechanic vs. reasonable mechanic” boils down to flat-rate labor. Many shops pay 0.5–1.5 hours for a four-wheel alignment regardless of how long the rack setup and adjustment actually take. A straightforward toe adjustment might run 30 minutes; one requiring heat, penetrant soak time, and careful wrench work on corroded hardware can easily double that. If your shop’s labor guide doesn’t account for corrosion, build a standard practice: flag it to a service writer before starting extra work, and get a supplemental labor line approved the same way you would for any other seized-fastener repair (exhaust hangers, caliper bolts, etc.). Customers generally accept a modest additional charge for penetrant/heat time far more easily than they accept a broken part discovered after the fact.
Quick Reference Checklist
- Confirm the part: rear lower rearward lateral arm / toe adjustment sleeve, not a different suspension link
- Soak with penetrating oil before applying any force
- Apply heat in short bursts, keeping clear of boots, lines, and wiring
- Use a non-slip wrench sized correctly to the flats — never round the corners
- Check for reverse-thread design before assuming a nut is seized
- Stop and quote replacement if there’s no movement after two heat/penetrant cycles
- Get supplemental labor approved before investing extra time beyond the flat-rate allotment

Tie Rod Adjusting Tool for Light Trucks - 1-1/8 In
Mfg: OTC Tools and Equipment
Part #: 7097

FAQs
How do I know if an adjuster has a reverse (left-hand) thread?
Check the manufacturer’s suspension diagram or shop manual for the specific vehicle before forcing a “stuck” nut. Many platforms intentionally reverse-thread one side so the sleeve can rotate for adjustment without disconnecting either end.
Is it safe to use a torch that close to the fuel tank and brake lines?
Yes, with care. Use a small-tip torch, apply brief, targeted heat only to the nut or sleeve, and keep a heat shield or wet rag near any nearby rubber lines, boots, or wiring. Never leave an open flame unattended near the undercarriage.
How much does a rear lateral arm replacement typically cost in parts?
Aftermarket arms commonly run in the $30–$55 range per side, depending on the vehicle; OEM parts cost more. Labor varies by shop but should account for the removal, installation, and a full alignment afterward.
Can heat damage the rubber bushings or boots on the arm?
Prolonged or excessive heat can degrade rubber bushings and CV-style boots nearby. Short, targeted bursts aimed only at the metal nut or sleeve minimize that risk; avoid “cooking” the area for extended periods.
Is penetrating oil like PB Blaster or Kroil actually better than WD-40 here?
Yes. Dedicated penetrating oils are formulated to wick into tight, corroded threads more effectively than general-purpose lubricants like WD-40, which is a better water-displacer than a rust-breaker.
How long should a rear toe adjustment take on a normal alignment?
On hardware that isn’t seized, toe adjustment itself typically takes well under 30 minutes once the vehicle is set up on the rack. Add time for soak-and-heat cycles if corrosion is present, and more if a sleeve needs replacing.
Shop Wheel Alignment Tools
When a rear toe adjuster is seized, having the right tools—precision wrenches, measurement equipment, and specialty fixtures—often determines whether the job goes smoothly or ends in a stripped fastener. Our wheel alignment tools selection includes everything alignment techs need.
- Alignment racks, turn plates, and measurement systems
- Specialty wrenches and adjustment tools for suspension work
- Toe plates, fixtures, and precision instruments

The Toolsource Technical Team blends decades of real-world automotive service experience with up-to-date technical research. Our writers collaborate with professional mechanics, shop owners, and diagnostic specialists to deliver practical, workshop-ready guidance you can trust.


Follow us on social media