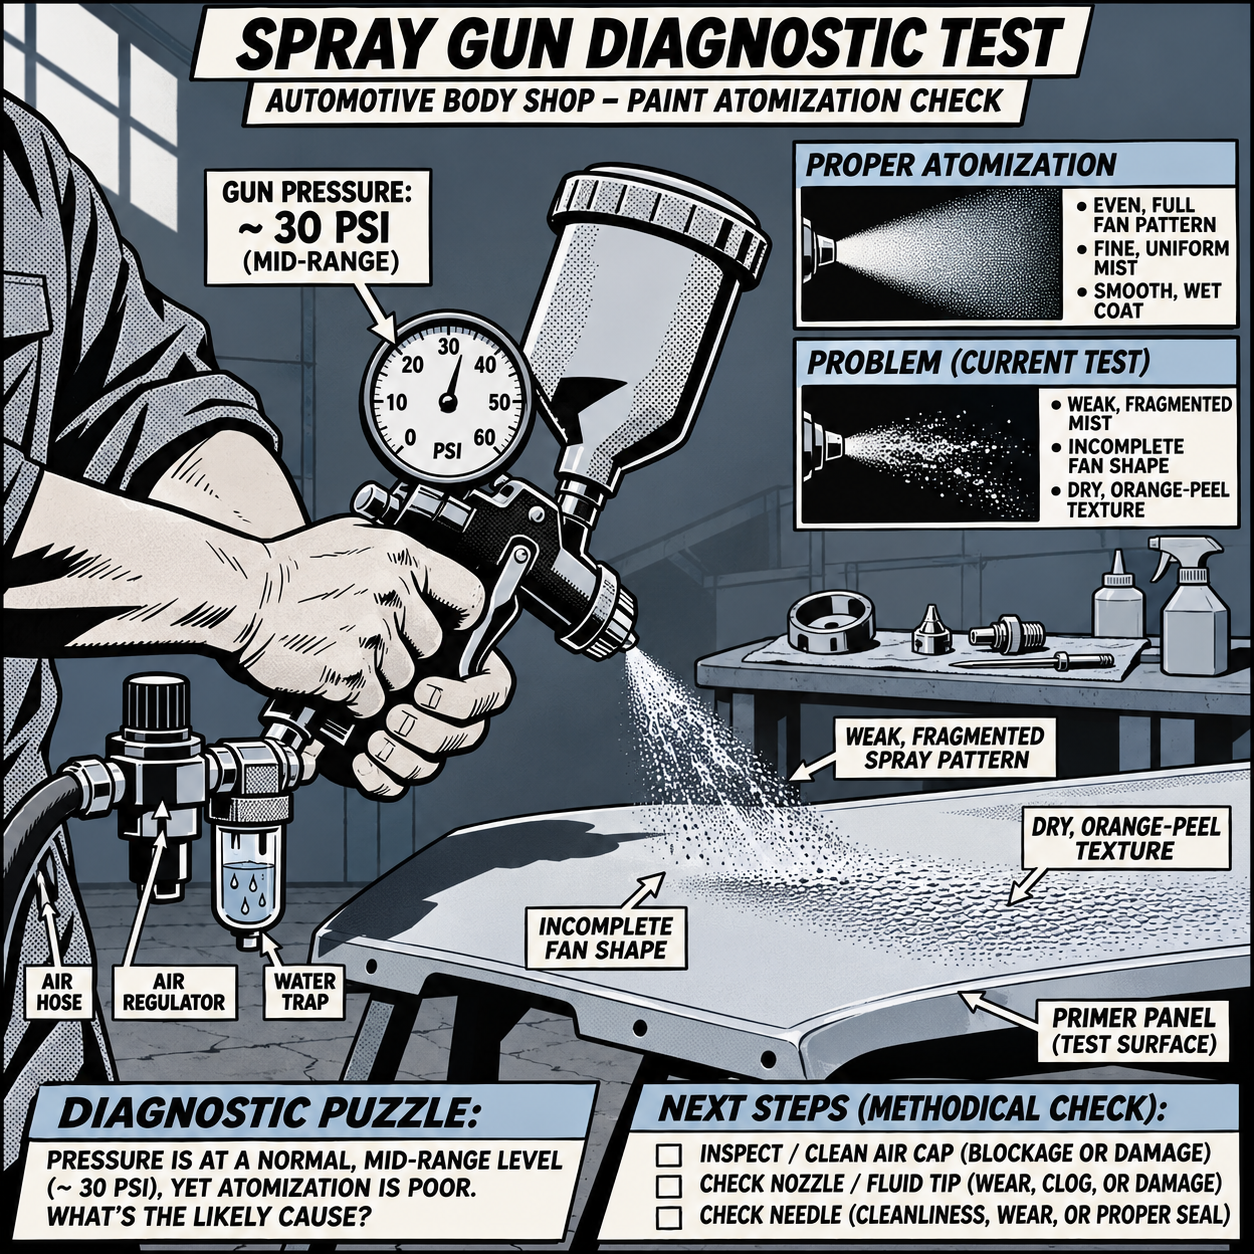
A spray gun that’s supposedly set to 32 psi but lays down material like it’s running off a straw is one of the most common — and most frustrating — problems in a body shop. The symptoms are familiar: weak fan pattern, orange peel, dry spray, or primer that barely dribbles out of the tip. Most techs jump straight to blaming the gun, but in practice the real cause is almost always somewhere else in the system: a stuck or inaccurate gauge, a restriction upstream of the gun, a clogged nozzle, the wrong fluid tip for the material, or primer that was never reduced properly. Work through these checks in order before you condemn the gun itself.
1. Confirm Your Gauge Is Actually Telling the Truth
Before chasing airflow or clogs, rule out the simplest explanation: the gauge is lying to you. Analog regulators — especially cheap inline ones — are notorious for sticking at a given reading after contamination or wear builds up inside the mechanism. A gauge can sit dead-still at “32 psi” while the actual pressure at the gun is a fraction of that, and because techs usually only glance at a gauge when something’s already wrong, a stuck needle can go unnoticed for a long time.
- Tap the gauge lightly while watching the needle — a stuck needle often jumps when tapped.
- Swap in a known-good gauge (or a digital regulator) and compare readings at the same setting.
- Check pressure at two points: at the compressor/regulator and again at the gun inlet. A big gap between the two tells you the problem is in the line, not the gauge.
- Watch the gauge during the half-trigger pull, not just at rest. Static pressure and pressure under flow should be close — a large drop when you pull the trigger points to a restriction, not a calibration issue.
Digital regulators are worth the upgrade if you’re troubleshooting pressure issues often. They don’t drift with contamination the way analog needles can, and you won’t be stuck guessing whether your “40 psi static, 30 psi firing” reading is a real pressure drop or a worn gauge.
2. Trace Airflow Restrictions From Compressor to Gun
If the gauge checks out, the next suspect is anything between the compressor and the gun tip that can choke volume even when pressure looks fine on paper. Pressure and flow (CFM) are not the same thing — a gauge can read 32 psi static and still starve the gun of the actual air volume it needs once the trigger opens.
- Hose diameter and length: Long, narrow-ID hoses drop usable CFM significantly. A 3/8″ ID hose is the minimum for most HVLP/conventional guns; anything smaller or excessively long chokes flow even at correct psi.
- Fittings and elbows: Quick-connect couplers, cheap regulators, and tight 90-degree elbows right before a water trap or filter are common bottlenecks. Swapping a cheap accessory for a full-flow fitting has fixed pressure complaints outright in plenty of real-world cases.
- Water trap and filter condition: A water trap or inline filter that’s never been drained or cleaned adds resistance and can mask a moisture problem at the same time.
- Compressor sizing: If your compressor can’t keep up with the gun’s CFM demand under continuous trigger pull, pressure will sag the longer you spray, even if it reads fine at idle.
Walk the line physically — don’t just trust the gauge at the start of the hose. Pressure measured at the compressor tells you nothing about what’s actually reaching the gun if there’s a restriction in between.


Mini-Regulator with Diaphram Air Pressure Regulator
Mfg: Sharpe Manufacturing Co
Part #: 1410

Air Pressure Regulator Assembly - Uses 18B-2R Regulator
Mfg: Sharpe Manufacturing Co
Part #: 1620
3. Strip the Gun Down and Clean Every Passage
If the air side checks out, the gun itself is the next stop — and a full teardown clean, not a quick wipe. Dried paint and primer build up invisibly inside passages that look clean from the outside.
- Remove the air cap/nozzle and inspect all four side air holes — these clog easily with overspray and dried material and directly affect atomization and fan shape.
- Pull the needle completely out and check it for dried material, scoring, or warping. A bent or coated needle won’t seat properly against the nozzle, which chokes fluid flow regardless of pressure.
- Check the needle seat and fluid tip for dried buildup or damage. Even a small ring of hardened material at the seat restricts flow.
- Soak metal parts in gun cleaner or the appropriate solvent, then run clean thinner or reducer through the whole gun before reloading with material, to confirm the passages are actually clear.
- Adjust the fan width and fluid flow dials to confirm they move freely and aren’t gummed up at one extreme.
A gun that sprays fine with straight thinner but chokes on primer almost always points back to either a clog you missed or a material/viscosity problem — which is the next thing to check.
4. Match the Fluid Tip Size to the Material You’re Spraying
Fluid tip size matters more than most techs give it credit for, and using the wrong size for the material is a frequent source of “why won’t this flow” complaints. As a rough guide:
- High-build/mud-slinging primer: 2.0–2.2mm tip. Thicker materials need the larger orifice to flow without excessive thinning.
- Standard epoxy or 2K primer: 1.7–1.8mm tip.
- Basecoat/color and clear: down to around 1.3mm.
A 1.7mm tip can technically handle high-build primer, but it’s working at the small end of its range, which means reduction and gun condition both need to be dead-on for it to perform. If you’re consistently fighting flow with high-build material through a smaller tip, stepping up to a 2.0mm or larger tip takes a lot of the pressure (literally) off the rest of the system.
5. Reduce and Filter Primer Correctly Every Time
Primer flow problems are frequently not an equipment issue at all — they’re a mixing issue. High-build primer is thick by design, and skipping proper reduction is one of the most common causes of a gun that sprays almost nothing. A few points matter every time:
- Always reduce, even for high-build: “High build” describes the film thickness it leaves, not a reason to skip thinning. Check the can for the correct ratio (commonly 4:1:1 for primer, but confirm against the product label) and don’t eyeball it.
- Strain it, every time: If primer won’t flow through a paper paint strainer into the mixing cup, it will not flow through the gun. Skipping the strainer — especially on a thick, fast-hardening primer — is a direct path to a clogged tip and starved flow within minutes of mixing.
- Stir thoroughly before pouring: Settled solids or unmixed hardener/activator create inconsistent viscosity that a strainer alone won’t fully fix.
- Mind your pot life and temperature: Primer thickens as it kicks off, and that happens faster than techs expect — a mix that sprayed fine minutes ago can be noticeably harder to push through at 70°F just a few minutes later. Spray promptly and don’t let mixed material sit in the cup.
- Check consistency by feel: A commonly used benchmark is a melted milkshake/Frosty consistency — thin enough to flow freely off a stir stick, not run-watery.
Multiple thin, properly reduced coats of high-build primer build film thickness just as effectively as fewer thick ones, without the flow fight — and you typically don’t even need to sand between those coats.
Quick Diagnostic Checklist
- Verify the gauge reading against a second gauge or digital regulator, both static and under trigger pull
- Check hose ID, length, fittings, and water trap/filter for restrictions
- Fully disassemble and clean the nozzle, needle, seat, and fluid tip
- Confirm fluid tip size matches the material (2.0–2.2mm for high-build primer)
- Reduce primer to the can’s spec, strain it, and stir thoroughly before loading the gun
- Spray a test pattern on cardboard before committing to the panel


Frequently Asked Questions
My gauge reads 32 psi but the spray is weak — what’s the most likely cause?
Start with the gauge itself (contamination can cause it to stick at a reading), then check for restrictions between the regulator and the gun — undersized hose, a tight elbow near a water trap, or a cheap fitting are common offenders. Measure pressure at the gun inlet, not just at the compressor.
Do I really need to reduce high-build primer?
Yes. “High build” refers to the dry film thickness it leaves, not a pass on thinning. Check the product’s data sheet for the correct ratio and reduce every batch — skipping this is one of the top causes of poor flow and clogging.
What fluid tip size should I use for primer vs. paint?
Roughly 2.0–2.2mm for high-build primer, 1.7–1.8mm for standard epoxy/2K primer, and down to about 1.3mm for basecoat and clear. Using too small a tip for a thick material makes every other variable (reduction, pressure, gun cleanliness) far less forgiving.
Why does my primer flow fine for a minute, then slow down?
Mixed primer starts hardening as soon as activator or hardener is added, and viscosity climbs quickly even at normal shop temperatures. Mix only what you’ll spray promptly, and don’t let loaded material sit in the cup between coats.
I skipped the paint strainer because the primer was flowing slowly — is that a problem?
Yes — that’s a strong signal the material is under-reduced or already partially gelled, and pouring it unstrained directly sets up a clog in the gun’s passages. If it won’t pass a strainer, thin it further before it goes near the gun.
Should I switch to a digital regulator?
If you’re regularly troubleshooting inconsistent pressure, a digital inline regulator removes one variable from the equation — analog needles can stick at a false reading after contamination, and you won’t notice until a job goes wrong.
Shop Spray Guns
Whether you’re diagnosing pressure issues on your current setup or ready to upgrade to a better regulator or different fluid tips, explore our spray gun selection.
- HVLP and conventional spray guns with multiple tip sizes
- Regulators, gauges, and pressure controls
- Hoses, fittings, water traps, and cleaning accessories

The Toolsource Technical Team blends decades of real-world automotive service experience with up-to-date technical research. Our writers collaborate with professional mechanics, shop owners, and diagnostic specialists to deliver practical, workshop-ready guidance you can trust.


Follow us on social media